Pages

Friday, November 26, 2010

Where’s the back of the Cisco UCS servers in the official Cisco provided Visio stencils?

I’ve been struggling with drawing out diagrams for a few Cisco UCS deployments as the stencils provided by Cisco did not appear to have all of the servers and when the new ones were made available on October 26, 2010, they seemingly did not have the rear/back end of the servers either. Thanks to a response I got from a fellow member of the Cisco community forums, it looks like it I’ve been wrong all this time and to view the other end of the servers, all you needed to do was right click on the shapes and select rear.

Silly me, as I’ve been working around this by drawing logical diagrams instead of using proper views of the shapes. I should seriously consider going on Visio training. :)

To download the stencils, visit: http://www.cisco.com/en/US/products/hw/prod_cat_visios.html

image

Open up the stencils in Visio:

2009 Stencils:

image

2010 Stencils:

image

Draw anyone of the shapes into the actual document, right-click and choose rear:

image

image

Hope this helps anyone out there that may be just as Visio challenged as myself. :)

Tuesday, November 23, 2010

Configuring Polycom SoundPoint IP 335 series phones with Exchange Unified Messaging as voicemail through an NET VX1200 gateway

I had the opportunity of integrating Unified Messaging with Polycom SoundPoint IP 335 series phones through an NET VX1200 gateway for an ongoing project over the past month and thought it was worth writing a blog post about what we needed to do to get the SIP phones to redirect unanswered calls to the user’s voice mailbox hosted on Exchange Unified Messaging.

Polycom® SoundPoint® IP 335

There are actually 2 ways to do this with the setup we had and they were:

  1. Use NET’s scripts on the VX1200 to pull the call back and redirect it to Exchange UM after a certain number of rings.
  2. Use the phone’s settings to send the call to Exchange UM after a certain amount of time.

We made an attempt with the NET engineer to try and configure it with the gateway but had some issues and since we were pressed for time to get the phones going, we opted for #2, which was through the Polycom phones.

The setup’s actually quite simply but I thought it’s worth while to blog this as we all know how we tend to forget what we did after a few months of not doing any configuration in the environment. What we’ll need is to identify the following:

User’s extension – This is the extension that you’ll be assigning to the user in Exchange UM:

image

Determine the delay in forwarding the call to voicemail – Within the Polycom SoundPoint IP 335’s configuration, this value is named: No Answer Timeout

Determine the extension for Exchange UM’s subscriber access – You can find this in the Exchange Management Console under: Microsoft Exchange –> Organization Configuration –> Unified Messaging –> UM Dial Plans –> <The Dialplan the user is in> –> Subscriber Access –> Associated Subscriber Access Numbers:

image

The IP address of the Polycom SoundPoint IP 335 phone – You can find this after you’ve plugged in the SIP phone into your network and once it has successfully gotten a DHCP lease or static IP if you’ve configured it as such.

Step 1 – Log into the phone’s web interface

Log into the phone’s web interface with your preferred browser.

Note: It took us awhile to figure out what the default login was for the Polycom SoundPoint IP 335 phones but in case anyone is looking for this, it’s actually:

Username: Polycom

Password: 456

image

Step 2 – Configure the proper line

Fill in the appropriate fields:

Display name: We named this field 2905 but it doesn’t really matter what you put in as it’s just information that identifies the user.

Address: We filled in the user’s extension for this field and I believe it’s important to do this with the type of configuration we had with the gateway.

Auth User ID: This should be the user name you’ve configured for user on the gateway. In our case, we simply configured the user ID and password on the gateway to be the user’s extension.

Auth Password: Fill in the password you configured on the gateway.

Label: We named this field 2905 but it doesn’t really matter what you put in as it’s just the label on the LCD screen of the phone.

Address: This should be the address of the gateway.

Port: This should be the port that’s configured on the gateway to accept the connection.

Transport: This depends on your gateway setup and because the NET VX1200 was configured for UDP, we set this configuration to UDPonly.

image

You can leave the Server 2 fields blank if you’ve only got a single gateway setup.

The Call Diversion and Message Center section is where we configure specific parameters for sending unanswered calls to voicemail as the previous settings were required to allow the phone to register with the gateway as a SIP phone.

Disabled On Shared: It’s up to you as to whether you want this enabled even if it was a shared phone.

Diversion Contact: This should be the extension of the user that will get forwarded to Exchange UM. Whether you need to put a + or not in here will depend on the translation rules on the gateway.

On Specific Caller: We left it as the default which was Enabled.

Forward All: We left it as the default which was Enabled.

On Busy: We left it as the default which was Enabled.

Busy Contact: We didn’t have this setting in when I took this screenshot but I later filled it out with the Exchange UM’s Subscriber Access extension so calls will get directed to voicemail if the user chooses to hit the “ignore” button when a call comes in. Otherwise, if the user chooses to ignore the call, the calling party will hear a fast busy signal.

On No Answer: This should be enabled.

No Answer Timeout: I never figured out whether this was in seconds or rings but we thought 10 was a good value for the duration between connecting the call and going to voicemail.

No Answer Contact: Put in the Exchange UM’s subscriber access extension in there.

Do Not Disturb Contact: We didn’t have this setting in when I took this screenshot but I later filled it out with the Exchange UM’s Subscriber Access extension so but I would suggest doing the same as we did for the Busy Contact.

Subscriber: Fill in the user’s extension in this field.

image

Callback Mode: Registration should be set for this field.

Callback Contact: The Exchange UM’s subscriber access number should be entered here.

image

The phone’s web configuration interface also had a SIP section but we found that it didn’t matter what we had in there or whether it was filled in.

image

image

Hope this helps anyone out there that may be doing a similar deployment.

Monday, November 22, 2010

How to properly uninstall the Nexus 1000v and unregister it from vCenter’s Plug-ins

The Nexus 1000v may look like your typical vCenter Distributed Switch but it’s definitely a lot more complicated to configure and even uninstall from vCenter. Since uninstalling it requires more than just using vCenter, this blog post serves to show how to uninstall the Nexus 1000v and unregister it from vCenter.

As some may already know, if you simply try to right click on the Nexus 1000v folder and click Remove, you’ll receive the error message:

“Cannot remove the object, since it has active related objects.”

image

image

Down below the task bar, you’ll see the entry:

image

So what now? The first thing you’ll need to do is remove the Nexus 1000v DVS from vCenter through either directly accessing the console or SSH-ing into the Nexus 1000v via putty or your preferred client. Here is a copy and paste of the commands I ran:

=~=~=~=~=~=~=~=~=~=~=~= PuTTY log =~=~=~=~=~=~=~=~=~=~=~=
login as: admin
User Access Verification
Using keyboard-interactive authentication.
Password:
Using keyboard-interactive authentication.
Cisco Nexus Operating System (NX-OS) Software
TAC support:
http://www.cisco.com/tac
Copyright (c) 2002-2010, Cisco Systems, Inc. All rights reserved.
The copyrights to certain works contained in this software are
owned by other third parties and used and distributed under
license. Certain components of this software are licensed under
the GNU General Public License (GPL) version 2.0 or the GNU
Lesser General Public License (LGPL) Version 2.1. A copy of each
such license is available at
http://www.opensource.org/licenses/gpl-2.0.php and
http://www.opensource.org/licenses/lgpl-2.1.php
youNexus1000vDVS# config t

youNexus1000vDVS(config)# svs connection vcenter

youNexus1000vDVS(config-svs-conn)# no vmware dvs

This will remove the DVS from the vCenter Server and any associated port-groups. Do you really want to proceed(yes/no)? [yes] yes

youNexus1000vDVS(config-svs-conn)# exit

youNexus1000vDVS(config)# exit

youNexus1000vDVS# exit

The following are explanations of what we’re doing:

youNexus1000vDVS# config t – you need to get into config mode in order to execute the following commands

youNexus1000vDVS(config)# svs connection vcenter – Once you’re in config mode, you can now enter the Nexus 1000v context

youNexus1000vDVS(config-svs-conn)# no vmware dvs – Once you’re in the right context, you can issue the “no vmware dvs” to tell vCenter to remove the Nexus 1000v and it’s folder. If you look into vCenter, you can actually see this task execute:

image

This will remove the DVS from the vCenter Server and any associated port-groups. Do you really want to proceed(yes/no)? [yes] yes

Now that you’ve successfully remove the folder and the Nexus 1000v DVS from the Networking view, you can proceed with deleting the supervisor module virtual machines.

Note: If you delete the virtual machines prior to executing the commands above, you would have had to reinstall the Nexus 1000v with the same name.

image

Now that we’ve removed the virtual machines, all that’s left is to remove the plug-in reference from within vCenter:

image

Navigate to http://yourvCenter/mob/ (MOB = Managed Object Browser):

image

Click on the content link:

image

Click on ExtensionManager:

image

From where, you’ll see a list of extensions listed. You will need to determine which Nexus 1000v extension you want to remove which is identified by the string of numbers at the end. In my case, I wanted to remove the one with “465894910”.

image

Once you’ve identified the extension, click on the UnregisterExtension link at the bottom of the screen under the Methods heading:

image

Paste in a copy of the extension name:

image

Click on the Invoke Method link and you should see the message void which indicates the extension has been successfully unregistered.

image

If you’re logged into vCenter with VI Client, make sure you close the VI Client and log in again before you check the plug-in manager because the Nexus will still seemingly be registered until you close the VI Client.

Simple enough of everything goes well but it doesn’t always go as smoothly as shown here. :)

Friday, November 19, 2010

Newly created Speech Enabled Auto Attendant announces: “Please call back later. Goodbye.” with event ID: 1086 warnings in the event logs

I’ve been working on a project for a client with Exchange 2007 Unified Messaging for the past 2 days as they prepare for two remote office deployments next week. Other than getting the NET VX1200 gateway and Polycom SIP phones configured and tested, I also had to create new Exchange UM auto attendants configured for the remote offices. I always find that no matter how simply the deployment may appear to be, it almost never goes smoothly and this one is no exception as I ran into a strange problem with getting these new speech enabled AAs to work.

Problem

You create a new Exchange 2007 Auto Attendant in the Exchange Management Console as such:

image

You make an attempt to call 5979 to reach the AA greeting and all you hear is:

“Please call back later. Goodbye”

This AA response is typically presented if there was something wrong with the prompt’s speech recognition so I went into the event logs to see if I could find more information and by reviewing the Application logs on the Exchange server, I found the following warning logged:

Automatic Speech Recognition (ASR) has been enabled on the UM auto attendant "MainAA". However, the speech grammar file "C:\Program Files\Microsoft\Exchange Server\UnifiedMessaging\grammars\en\2d45da8d-6bb5-40c8-a79a-6d59911369de.cfg" cannot be found. Until this problem is corrected, ASR will be disabled for this auto attendant.

For more information, see Help and Support Center at http://go.microsoft.com/fwlink/events.asp.

image

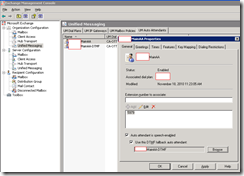
Just so I was sure that there was something wrong with this prompt, I went ahead to create a DTMF fallback prompt as such:
image

… to see what would happen and as expected, calling into the speech enabled prompt immediately played the message:

“Let me transfer you to our touch tone service.”

Analyzing the Problem

The warning message gave a pretty good explanation of what was causing this so I went ahead and navigated to the directory:

C:\Program Files\Microsoft\Exchange Server\UnifiedMessaging\grammars\en\

… to see if the .cfg file:

2d45da8d-6bb5-40c8-a79a-6d59911369de.cfg

… actually existed and not surprisingly, that file wasn’t there.

image

So after searching this specific warning on the internet, I found that there was a 30 minute interval schedule that the generator rules on so I went ahead to use PowerShell to check and got the following output:

GrammarGenerationSchedule : {Sun.2:00 AM-Sun.2:30 AM, Mon.2:00 AM-Mon.2:30 AM,
Tue.2:00 AM-Tue.2:30 AM, Wed.2:00 AM-Wed.2:30 AM, T
hu.2:00 AM-Thu.2:30 AM, Fri.2:00 AM-Fri.2:30 AM, Sa
t.2:00 AM-Sat.2:30 AM}
IsValid : True

Seeing how the scheduling wasn’t the problem, a bit more digging revealed that you could force Exchange to regenerate this file with galgrammargenerator.exe. Since I was familiar with this executable, I figure I give it a shot but after executing every single switch I could find, the cfg file wasn’t created.

image

Since it was getting late in the day and this didn’t have to be resolved, I went ahead and posted the question on our Microsoft Partner Forum to see if I would get a resolution the next day.

Solution

So the Microsoft Partner Support Engineer wasn’t really able to help out as the response I got back was to send him some more information and since it was semi-important to get this resolved the next day, I went back to troubleshooting it myself. I think starting fresh in the morning really helped because as I continued to run galgrammargenerator.exe and fiddle with the dial plan and users, I somehow got another cfg created:

image

While this was generated for another AA, it ended up leading me to figure out what was the cause of my problem.

So what happened? What happened was that Exchange 2007 WILL NOT be able to generate the cfg file if you do not have anyone enabled for Unified Messaging in the dial plan. I got lucky in the morning because I was also testing subscriber access so I had to enable myself for Unified Messaging for another dial plan and ended up creating the new cfg file when I reran galgrammargenerator.exe.

The following is essentially what you need to do if you run into this situation:

1. Make sure you have someone enabled for Unified Messaging in this dial plan.

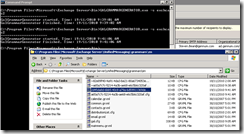
2. Navigate to C:\Program Files\Microsoft\Exchange Server\Bin> and execute GALGRAMMARGENERATOR.exe -s exchServerName.

C:\Program Files\Microsoft\Exchange Server\Bin>GALGRAMMARGENERATOR.exe -s exchca

s2

======================

GalGrammarGenerator started. Time: 19/11/2010 9:39:01 AM

GalGrammarGenerator finished. Time: 19/11/2010 9:39:02 AM
image

3. Open up Windows Explorer and navigate to the folder: C:\Program Files\Microsoft\Exchange Server\UnifiedMessaging\grammars\en\ and check to see if the cfg file has been created. You can also check in the event log for the information event ID: 1140 and 1141 which will tell you it has successfully created the cfg file:

The Unified Messaging server has successfully generated a speech grammar file for UM dial plan "CA-OTT".. The grammar file is named "C:\Documents and Settings\tluk\Local Settings\Temp\1\2d45da8d-6bb5-40c8-a79a-6d59911369de.grxml".

For more information, see Help and Support Center at http://go.microsoft.com/fwlink/events.asp.

image

The Unified Messaging server has created a grammar file named "C:\Documents and Settings\tluk\Local Settings\Temp\1\2d45da8d-6bb5-40c8-a79a-6d59911369de.grxml". The grammar file was then compiled into a file named "C:\Documents and Settings\tluk\Local Settings\Temp\1\2d45da8d-6bb5-40c8-a79a-6d59911369de.cfg".

For more information, see Help and Support Center at http://go.microsoft.com/fwlink/events.asp.

image

Nothing to it right? I guess it sort of makes sense for a speech enabled auto attendant to require having “users” or “a user” to be enabled for UM so it has something to put into that cfg file when doing name lookup.

Thursday, November 18, 2010

Error and Warning Event ID: 2501, 2604, 2601 logged on Exchange 2007 Server

I came across an Exchange 2007 server with CAS, Hub Transport and Exchange UM roles installed that consistently had event ID: 2501, 2604, 2601 from source MSExchange ADAccess logged every 14 to 16 minutes. The events are as follows:

Error: Event ID 2501

Process MSEXCHANGEADTOPOLOGY (PID=1424). The site monitor API was unable to verify the site name for this Exchange computer - Call=DsctxGetContext Error code=8007077f. Make sure that Exchange server is correctly registered on the DNS server.

For more information, see Help and Support Center at http://go.microsoft.com/fwlink/events.asp.

image

Error: Event ID 2604

Process MSEXCHANGEADTOPOLOGY (PID=1424). When updating security for a remote procedure call (RPC) access for the Exchange Active Directory Topology service, Exchange could not retrieve the security descriptor for Exchange server object serverName - Error code=8007077f.

The Exchange Active Directory Topology service will continue with limited permissions.

For more information, see Help and Support Center at http://go.microsoft.com/fwlink/events.asp.

image

Warning: Event ID 2601

Process MSEXCHANGEADTOPOLOGY (PID=1424). When initializing a remote procedure call (RPC) to the Microsoft Exchange Active Directory Topology service, Exchange could not retrieve the SID for account <WKGUID=DC1301662F547445B9C490A52961F8FC,CN=Microsoft Exchange,CN=Services,CN=Configuration,...> - Error code=8007077f.

The Microsoft Exchange Active Directory Topology service will continue starting with limited permissions.

For more information, see Help and Support Center at http://go.microsoft.com/fwlink/events.asp.

image

Solution

So what fixed it? The error went away after I restarted the server: Microsoft Exchange Active Directory Topology Service in the services console. Note that the following services rely on this:

Microsoft Exchange Unified Messaging

Microsoft Exchange Transport Log Search

Microsoft Exchange Transport

Microsoft Exchange File Distribution

Microsoft Exchange EdgeSync

Microsoft Exchange Anti-spam Update

image

image

This essentially means that all your services will briefly go down so be aware of this before you restart it.

I just checked back after 5 hours and haven’t seen those errors and warnings appear since the service was restarted.

Wednesday, November 17, 2010

How Speech Enabled and Non Speech Enabled Auto Attendants behave in Exchange 2010

I find myself repeating the same routine of having to go back to my scattered notes when configuring Exchange UM auto attendants after a few months of not touching any environment so this post serves to be a reference for me to refer to where ever I am as well as others who may be interested in the behavior of speech enabled or not auto attendants and greeting prompts in Exchange 2010.

Speech Enabled

If you create a speech enabled prompt as such:

image

… leaving all the settings as default, you will get the following message when you call in:

Thank you for calling the Microsoft Exchange Auto Attendant. To reach a specific person, just tell me their name.

Now if you add key mappings to the auto attendant as such:

image

… you will get the following message when you call in:

Thank you for calling the Microsoft Exchange Auto Attendant. If you know the name of the person or option that you want, please say it at anytime. Otherwise, please wait for the list of options: Pressed 1.

Note how the greeting, which I have highlighted in red, has now changed. Also note that the “Pressed 1” is also included at the end because the description I entered for the key mapping has “Pressed 1”.

-----------------------------------------------------------------------------------------------------------------------------------------------------------

With Custom Prompts

So how does custom greetings change this? If I put a custom greeting into the Business hours greeting as such:

image

… you will get the following message:

Custom prompt (Business hours greeting) + If you know the name of the person or option that you want, please say it at anytime. Otherwise, please wait for the list of options: Pressed 1.

Notice how the:

Thank you for calling the Microsoft Exchange Auto Attendant.

… has now been replaced by the custom prompt but the options are still read by Exchange UM.

Now what happens when I add a blank wav/wma file to the Main Menu Prompt?

image

With this configuration, you’ll hear the following:

Custom prompt + blank.

Blank being nothing.

From these examples, it’s easy to see that the following default greetings map to the following prompts:

Business hours greeting: Thank you for calling the Microsoft Exchange Auto Attendant.

Business hours main menu prompt: If you know the name of the person or option that you want, please say it at anytime. Otherwise, please wait for the list of options: Pressed 1.

Note that it’s important to realize the following:

Since this is a speech enabled auto attendant, the placement of the greeting whether it’s in the Business hours greeting OR Main Menu Prompt doesn’t matter so much because you can interrupt the prompt with the key mappings regardless of whether the prompt is finished playing or not. If this was not speech enabled, I would always use a blank file for the Business hours greeting and put 1 long greeting in the Business hours main menu prompt because if I didn’t, the user would have to wait till the greeting is over until the auto attendant would accept a key. See this post for more information: http://terenceluk.blogspot.com/2010/12/1-is-not-valid-response-from-exchange.html.

-----------------------------------------------------------------------------------------------------------------------------------------------------------

Non Speech Enabled

Now if you configure an auto attendant that’s not speech enabled as such:

image

… and call in, you’ll hear the following:

Thank you for calling the Microsoft Exchange Auto Attendant. Use the keypad to spell or the person you are calling, last name first. Or to spell the part of their email address before the @ sign, press the # key twice. If you know the extension, press the # key.

I didn’t thoroughly test this but I would say that it can be safely assumed that the rules applied to the speech enabled prompts would be applied here where:

Business hours greeting: Thank you for calling the Microsoft Exchange Auto Attendant.

Business hours main menu prompt: Use the keypad to spell or the person you are calling, last name first. Or to spell the part of their email address before the @ sign, press the # key twice. If you know the extension, press the # key.

If you were to put in key mappings, you’ll get pretty much the same greeting but without the option of using voice commands.

Exchange UM error when configuring Auto Attendant prompt with wave file: The format of .wav file is not valid.

This was one of the problems I’ve come across a few years back when I did my first Exchange 2007 Unified Messaging deployment and since I’m currently on a Exchange UM project, I thought I would take this opportunity to mimic the error:

The format of .wav file is not valid.

…and explain why and how to get around it.

Problem

You’re configuring an Auto Attendant prompt in Exchange 2007 or 2010 but when you select a custom wav file in the Greetings tab and hit the Ok button, you receive the following error:

Microsoft Exchange Error

The following error(s) occurred while saving changes:

Copy-UMCustomPrompt

Error:

The format .wav file c:\someWavFile.wav is not valid.

image

Explanation

To give you a bit of background information, the prompt I used in the above example was actually a recording I did from Exchange UM’s voicemail. I basically just called into my own voicemail box and recorded a message, went into Outlook, copied the wav file out and tried to use it. The reason why Exchange UM rejected this as a greeting was because the file format does not meet the requirements. I find that I get laughed at every time I tell the client that while we can use voicemail recordings for Auto Attendant greetings, they need to be converted to a higher quality format because the native format isn’t supported. To me, it does sort of make sense because when you think of it from a storage perspective, trading a higher quality voicemail recording for less storage space seems like a logical choice. So here’s a side by side comparison between a non supported voice recording from a voicemail and one that’s supported:

Not Supported – Wav file from Exchange UM’s voicemail recording

Bit Rate: 13kbps

Channels: 1 (mono)

Audio sample rate: 8 kHz

Audio format: GSM 6.10

image

Supported – Converted

Bit Rate: 128kbps

Audio sample size: 16 bit

Channels: 1 (mono)

Audio sample rate: 8 kHz

Audio format: PCM

image

As seen in the above screenshots, the audio format isn’t even the same.

Solution

The solution’s fairly simple and all you have to do is use Windows’ Sound Recorder application either from your desktop/laptop or on the server (if it’s available) to convert it:

image

image

Open the wav file with the application:

image

Choose the Save as option and choose the change button at the bottom:

image

Choose the proper format:

image

Save the file:

image

Once completed, use the new wave file and you’re done. Keep in mind that we’re converting a lower quality wav file to a higher quality format so all the negatives of using a low quality audio file applies.