Step #1 – Create a Logic App with a “When a HTTP request is received” trigger
Begin by creating a Logic App with a When a HTTP request is received trigger:
Note that the HTTP URL is not generated until it is saved and we’ll need it for the next step so proceed to save the Logic App:
The URL
will be displayed one saved. Proceed to copy the URL to notepad as we’ll be
using in shortly:
Step #2
– Configure Logic App permissions to Storage Account
The Logic
App will need to have permissions to read and edit the blob contents of the
storage account and the best way to provide this is to use a System assigned
managed identity. Proceed to navigate to the Identity blade of the newly
created Logic App and turn on the feature:
Next,
navigate to the storage account and grant the managed identity Storage Blob
Data Contributor:

Step #3
– Configure an Event Grid Subscription
The next
step is to configure an Event Subscription for the storage account that
you want to monitor so any files uploaded/copied to the storage account will
trigger an Event. The easiest way to do this is simply navigate to the storage
account, select the Events blade, and click on + Event
Subscription:
Fill out
the following properties of the Event Subscription:
Name: Provide a name for the Event
Subscription
Event
Schema: Event Grid
Schema
Topic
Type: This should
already pre-populated with Storage account
Source
Resource: This
should be pre-populated with the storage account name
System
Topic Name: Provide
a name for the System Topic
For the Filter
to Event Types, select the type of events you want to trigger. For the
purpose of this example, we’ll be using Blob Created.
For the Endpoint
Type, select Web Hook:
The option
to Configure an Endpoint will now be presented:
Click on
the hyperlink and paste the Logic App HTTP URL we pasted into notepad:
Click on Confirm
Selection:
Proceed to
create the Event Subscription:
An Event
Subscription will now be created for the storage account, which will
generate an event whenever a blob is created in the storage account. Note that
you can have multiple Event Subscriptions for the storage account for
different purposes. Proceed to click into the subscription we have just
created.
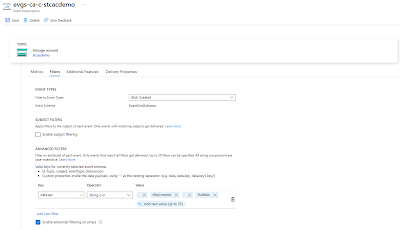
Each Event
Subscription provides customization options and the one we are interested
in for this example is the Filters under the Filters tab:
As shown in
the screenshot below, we are currently filtering this event subscription to
only Blob Created events. More information about filtering features can
be found in the following documentation:
Filter events for Event Grid
https://learn.microsoft.com/en-us/azure/event-grid/how-to-filter-events
We’ll be
using Advanced Filters to filtering out only upload types delivered via SFTP
and Storage Account APIs, which will include portal.azure.com uploads.
To accomplish this, we’ll be configuring the following:
Key: data.api
Operator: String is in
Value:
SftpCommit
PutBlob
The reason
why we’re adding this advanced filter is because the JSON payload generated by
the event grid contains a key named api with a value indicating how the
blob was created. The value we entered as filter will cause this subscription
to only fire when the api key matches the specified values. Below is a sample
of the event with the key highlighted in red:
[
{
"topic":
"/subscriptions/xxxxxxx-xxxxxxxxxxx-xxxxxxxxxxx/resourceGroups/rg-ca-c-demo/providers/Microsoft.Storage/storageAccounts/stcacdemo",
"subject":
"/blobServices/default/containers/amco/blobs/FromABC/Claims
Register/Test5.txt",
"eventType":
"Microsoft.Storage.BlobCreated",
"id":
"493e4d1e-801e-0052-2eea-9eed6a069a42",
"data": {
"api": "PutBlob",
"clientRequestId":
"831646a5-cd07-4143-bfd9-c8f2a708504e",
"requestId":
"493e4d1e-801e-0052-2eea-9eed6a000000",
"eTag":
"0x8DC6D013028E3BF",
"contentType":
"text/plain",
"contentLength": 5,
"blobType":
"BlockBlob",
"blobUrl": https://stcacdemo.blob.core.windows.net/amco/FromABC/Claims
Register/Test5.txt,
"url": https://stcacdemo.blob.core.windows.net/amco/FromABC/Claims
Register/Test5.txt,
"sequencer":
"0000000000000000000000000002151600000000001459df",
"identity":
"$superuser",
"storageDiagnostics": {
"batchId":
"3b79f542-8006-0089-00ea-9e2b57000000"
}
},
"dataVersion": "",
"metadataVersion": "1",
"eventTime":
"2024-05-05T12:45:05.0154048Z"
}
]
Proceed to
save the configuration:
Step #4
– Complete the configuration of the Logic App for automation
With the
subscription configured, we’ll need to generate an event so we can capture a
sample payload of the event (what we pasted above) and generate a schema. Go
ahead and upload a file into the storage account:
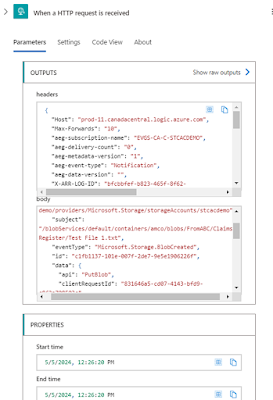
Navigate to
the successful run and open the details of the When a HTTP request is
received step that was executed:
The content
we are interested is the body as it provides a sample of what this event
generates. Proceed to copy the content:
With the
sample JSON payload, proceed to navigate into the Logic app designer:
Update the
trigger When a HTTP request is received with a schema by clicking on Use
sample payload to generate schema:
Paste the
sample Body copied:
Note a
schema is now created. Note that this step is important because if a schema is
not defined then future steps will not allow you to selectively extract the
various keys in the JSON payload. While it is possible to use functions to
extract information from the full body of the JSON payload, it is much more
efficient to obtain information by selecting the key.
Now that we
have the inbound HTTP request configured, we can proceed to extract the Subject
key and its value, which will contain the folder path and file name of the blob
uploaded into the storage account. Click on the + button to add an
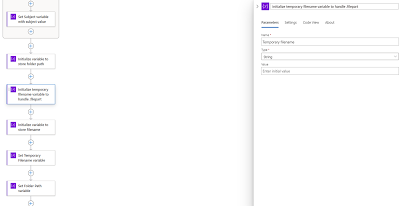
action and search for initialize variable:
Provide a
meaning name for this action, a name for the variable we are initializing, and
select String as the type since this value will be text. This example
will use Subject.
Proceed to
add another step:
Search for set
variable and select the action:
Provide a
meaning for name for this action, select the previous initialized variable
named Subject and click into the Value text field, which will
display 2 symbols to the left. Select the lightening icon:
Since a
schema was defined for the inbound HTTP request, we will see the individual
keys available for select. This variable is configured to store the subject
value so proceed to select the subject value under When a HTTP
request is received. Note that there are more keys available than what is
displayed and the additional ones can be displayed by clicking on the See
More (19) text as shown in the screenshot below:
Click on
the carrot > text to minimize the variable window:
Note that a
For Each step is automatically created for this Set Variable step
because the action will traverse through JSON body payload to extract the
subject:
With the
subject value extracted and stored in a variable, we can now parse the value
with functions to obtain the folder path and the name of the file.
Sample
value:
"subject":
"/blobServices/default/containers/amco/blobs/FromABC/Claims
Register/Test5.txt",
We’ll be
initializing 3 variables:
- Folder Path
- Temporary filename
- Filename
The reason
why we have a temporary filename is because I ran into a strange issue with a
previous project where SFTP uploads can trigger the event just before a file
upload has completed. This in turn caused the filename captured in the even to
contain a .filepart extension. A ticket opened with Microsoft didn’t go
anywhere so I decided to put an addition conditional action to handle this
scenario.
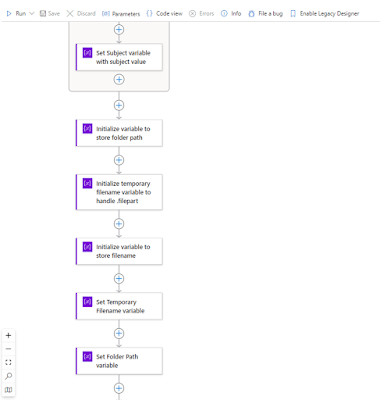

With the
variables initialized, we will now proceed to set the values with the Set
Variable action.
To set the temporary
filename, we’ll be using a function to parse the subject value:
last(split(variables('Subject'),
'/'))
This
function will use the split and last function to extract the file
name:
To set the Folder
Path, we’ll be using a function to parse the subject value:
substring(substring(variables('Subject'),
add(indexOf(variables('Subject'), '/FromABC/'), 9)), 0,
lastIndexOf(substring(variables('Subject'), add(indexOf(variables('Subject'),
'/FromABC/'), 9)), '/'))
This
function will use the subsctring function to extract the folder name by
locating the last folder before the folder path we want to capture, move the
index forward by the amount of characters for the folder we do not want, then
extract the remaining text onwards. Make sure you change the value of 9 if FromABC
is changed to another name.
Proceed add
a condition that will handle the SFTP upload issue I mentioned above:
Configure
the condition to check the Temporary filename value to see if it contains
the text filepart, then depending on whether the condition is True
or False, we will set the filename variable accordingly:
If the
condition is True which means the file does contain filepart,
proceed to remove the extension with the function and set the Filename
variable:
replace(variables('Temporary
filename'),'.filepart','')
If the
condition is False, then we can simply set the Filename variable
with the Temporary filename variable value:
Now that we
have the filename and folder path extracted, we can proceed with
the actions that will copy and upload the files onto SharePoint.
Add an
action and search for Get blob content, then select Get blob content
(V2):
Populate
the fields with the storage account and the blob path. This step will store the
uploaded blob content that will be used to copy onto SharePoint.
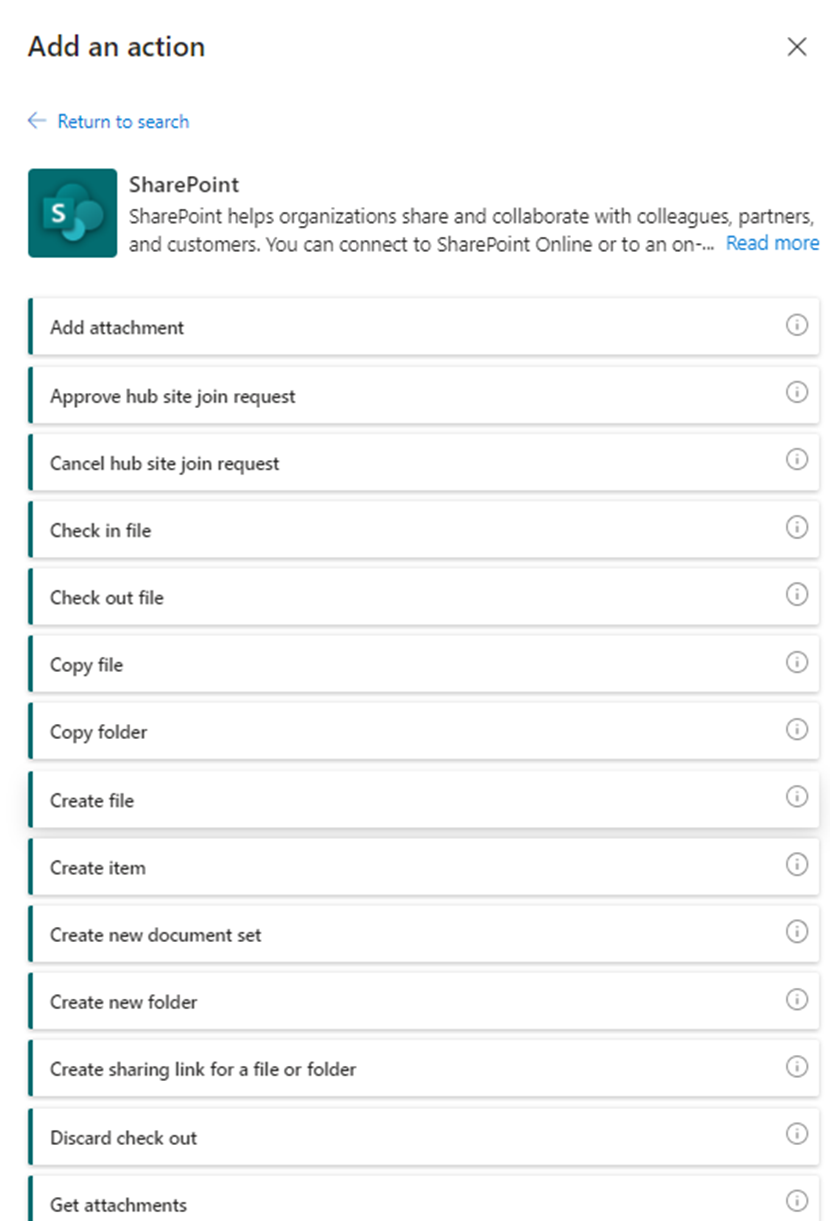
Add an
action and search for SharePoint, then select See more:
Select Create
file:
Fill in the
Site Address, Folder path, File Name, and File Content
(this will be populated with the previous action Get blob content (V2)):
One of the
issues I encountered with this step is when handling existing files on the
Storage Account. If a user uploads and overwrites the file, the corresponding
SharePoint upload will fail. There are 2 potential ways of handling this and
the first one is to configure additional steps to check if the file exists in
SharePoint, then remove and upload. Another as discussed in this blog post is
to disable chunking, which will allow the Logic App action to overwrite the
file: https://mikestephenson.me/2021/07/30/create-or-update-file-and-folder-to-sharepoint-in-logic-apps/
For the
purpose of this example, we’ll be disabling it.
Now that we
have the actions configured for copying new files to SharePoint, we can
complete the Logic App with a notification. We’ll begin by initializing a
variable to store the HTML code we’ll use as the email notification’s body:
Proceed to
add the action Send an email (V2):
And
complete the notification action:
The
notification will look as shown in the screenshot below for each file uploaded:
Hope this
helps anyone who may be looking for a demonstration of this type of
configuration.