Pages

Saturday, January 10, 2015

Attempting to reinstall VMware Horizon View Connection Server throws the error: “The currently logged on user does not have sufficient privileges on the existing Directory Services instance…”

Problem

You attempt to reinstall VMware Horizon View Connection Server on an existing server after removing VMware Horizon View Connection Server from Programs and Features:

image

… but notice that you receive the following error message when you rerun the install on the server:

The currently logged on user does not have sufficient privileges on the existing Directory Services instance. Please log in as a user with full View Administrator rights and then retry this installation.

image

Solution

The reason why this prompt is presented is because the account you’ve used to reinstall the View Connection server does not have permissions to the AD LDS Instance VMwareVDMDS that is installed on the server. If this is a single server deployment and you are rebuilding the environment then it is safe to proceed and uninstall the AD LDS Instance VMwareVDMDS from Programs and Features:

image

Select the Skip option when prompted for credentials:

image

Once the AD LDS Instance VMwareVDMDS has been uninstalled, you can proceed with the install of the View Connection Server.

Monday, January 5, 2015

Attempting to open Exchange Server 2010’s Exchange Management Console throws the error: “Initialization failed - The following error occurred while attempting to connect to the specified Exchange server ‘exchangeServer.FQDN’: The attempt to connect to http://exchange.domain.com/PowerShell using "Kerberos" authentication failed: Connecting to remote server failed...”

Problem

You attempt to open the Microsoft Exchange On-Premises node in the EMC (Exchange Management Console) but receive the following error:

Initialization failed

The following error occurred while attempting to connect to the specified Exchange server ‘exchangeServer.FQDN’:

The attempt to connect to http://exchange.domain.com/PowerShell using "Kerberos" authentication failed: Connecting to remote server failed with the following error message: The WS-Management service cannot process the request. The system load quota of 1000 requests per 2 seconds has been exceeded. Send future requests at a slower rate or raise the system quota. The next request from this user will not be approved for at least 1381355264 milliseconds. For more information, see the about_Remote_Troubleshooting Help topic.

image

Solution

This was the first time I’ve seen this error and while the message is not exactly the same as the one I wrote about in a previous post:

Unable to open Exchange Server 2010’s Exchange Management Console with the error: “The attempt to connect to http://exchange.domain.com/PowerShell using "Kerberos" authentication failed: Connecting to remote server failed...”
http://terenceluk.blogspot.ca/2011/08/unable-to-open-exchange-server-2010s.html

The solution where I restarted the World Wide Web Publishing Service worked:

image

Friday, January 2, 2015

Citrix NetScaler's Upgrade Wizard fails to load with Java Applet error message: "Cannot load Applet"

Problem

You attempt to use the Upgrade Wizard option on a Citrix NetScaler 10.5 to upgrade from a July 2014 build to the latest December 18th, 2014 build but receive the following error in the browser:

image

image

image

Cannot load Applet

Java Applet could not be loaded

Details

Possible reasons:

JRE(Java Runtime Environment) not installed.

JRE is installed but not running.

Java browser plug-in is not installed or not enabled.

Click here for Frequently Asked Questions.

image

The Java installed on the computer accessing the web GUI is:

Java Version 7 Update 60 (build 1.7.0_60-b19)

image

Solution

As administrators of NetScaler 10.5 or later would know, most of the web GUI has been changed to discontinue the use of Java in favour of HTML 5 which I’m sure has made a lot of us happy given all the Java related issues similar to the one above.  Unfortunately, not all components have moved away from Java and the Upgrade Wizard is one of them so to get around this, simply open the Java Control Panel from the Control Panel, navigate to the Security tab and click on the Edit Site List…:

image

In the Exception Site List window, add the IP address of the NSIP of your NetScaler(s):

image

image

Click on the OK button for each opened window to apply the changes:

image

The upgrade wizard should now load:

image

Wednesday, December 24, 2014

Extending VMware VM’s VMDK disk with command line vmkfstools

Those who have recently upgraded to vSphere 5.5 may have noticed that if you’ve also gone ahead and upgraded the virtual machine’s hardware to version 10 would result in the inability to edit the virtual machine’s settings via the vSphere Client because you are now forced to use the vSphere Web Client as the following message indicates:

You cannot use the vSphere Client to edit the settings of virtual machines of version 10 or higher.

Use the vSphere Web Client to edit the settings of this virtual machine.

image

Most administrators at this point can proceed by logging onto the vSphere Web Client to edit the settings but what if vCenter was down?  Connecting directly to the host wouldn’t allow you to edit the settings either.  The workaround to this is to actually update the client to vSphere Client 5.5 Update 2 which would result in the following message when you attempt to edit a virtual machine’s settings:

You are about to edit a virtual machine of version 10 or higher. Only version 8 features will be available for Edit using this client.

If you want to edit the advanced hardware features of this virtual machine, please use the vSphere Web Client to login to vCenter.
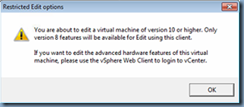
image

Various advanced properties won’t be available but actions such as extending a hard disk is allowed.

There has been times where I’ve found myself stuck in a datacenter without access to the internet which therefore means upgrading the vSphere Client to 5.5 Update 2 would not be possible.  The workaround to this is to use the command line via SSH or console to extend the disk and the following outline the steps to do this.

Step #1 – Check for Snapshots

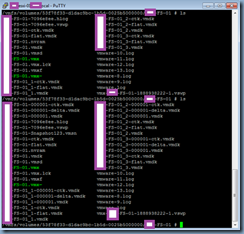
The first step for this process is to ensure that there are no snapshots created on the VM that you are attempting to extend the VMDK.  There are plenty of ways to determine whether there are snapshots such as browsing into the directory of the virtual machine and looking for -delta.vmdk files as shown in the following screenshot where ls was executed before and after a snapshot was created:
image

Another method which I favour in using is to use the vim-cmd command to list snapshot information for the virtual machine.  The reason why I favour the vim-cmd command is because it is available via the ESXi’s console with no reliance on PowerCLI which requires vCenter to be up and if vCenter was up, you could just use the Web Client to increase the disk size.

Before I begin, note the following handy CLI reference site which I use quite frequently:
http://kb.vmware.com/selfservice/microsites/search.do?language=en_US&cmd=displayKC&externalId=2012964

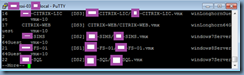
Begin by SSH or accessing the console of the ESXi server that the VM is hosted on and execute the following command to list the VMs:

vim-cmd vmsvc/getallvms | more

The VM we’re interested in is the -FS-01 server:
image

Note the VMID # on the left which in this case is 21.

With the VMID obtained, proceed by executing the following command to list the snapshots:

vim-cmd vmsvc/snapshot.get [VMID]

For this example, we’ll execute the following:

vim-cmd vmsvc/snapshot.get 21

image

Note that there is a snapshot named Snappy for this VM.

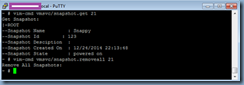
To remove all snapshots on this VM, continue by executing the following command:

vim-cmd vmsvc/snapshot.removeall [VMID]

For this example, we’ll execute the following:

vim-cmd vmsvc/snapshot.removeall 21
image

You can verify that the snapshots are gone by executing:

vim-cmd vmsvc/snapshot.get 21

… again.

Step #2 – Expand VMDK with VMKFSTOOLS

Before I begin, note that expanding a disk with vmkfstools requires the VM be powered off and I am unable to find a way to expand the disk while the VM is powered on even though the vSphere Client allows it so when I do, I’ll update this post.  To shutdown the VM, execute the following command:

vim-cmd vmsvc/power.shutdown vmid

For this example, we’ll execute the following:

vim-cmd vmsvc/power.shutdown 21

With the VM powered down, continue by browsing to the directory of the VM and execute:

du -ah

… to list all the files and the size:

image

The disk we’re going to expand for this example is named -FS-01_3.vmdk which is currently at 1.0G.  The command we’ll use to expand the disk is:

vmkfstools -X <sizeOfVMDK>GB <diskname>.vmdk

… where we’ll need to define the size of the VMDK and the VMDK file name.  Note that the size defined here is the total size so the final size of the VMDK would be so if we use 9GB, it would expand the VMDK to the size of 9GB and not 9 + 1 = 10GB.  Also, the VMDK filename we’ll be using is the FS-01_3.vmdk and NOT the FS-01_3-flat.vmdk file even though that file has a size associated to it.

For this example, we’ll be executing:

vmkfstools -X 9GB FS-01_3.vmdk

image

--------------------------------------------------------------------------------------------------------------------------------------------------------------

Note that you’ll receive the following error if you forget to shut down the VM prior to executing this command:

Failed to extend disk : Failed to lock the file (16392).

image

--------------------------------------------------------------------------------------------------------------------------------------------------------------

Rerun du -ah to see the updated size:

image

Now power on VM with the following command:

vim-cmd vmsvc/power.on vmid

For this example, we’ll be executing:

vim-cmd vmsvc/power.on 21

Proceed and expand the volume in the guest VM’s operating system (i.e. Computer Management):

image

image

Sunday, December 14, 2014

Upgrading Nutanix blades from ESXi 5.1 to 5.5

I don’t usually perform upgrades of Nutanix blocks from 5.1 to 5.5 but I’ve noticed that whenever I do, I’ve always had to reference an email in my Outlook’s Draft folder with the notes and screenshots I’ve captured during a previous upgrade so just in case I needed to reference it in the future, I’m going to go ahead and get a post written on my blog.

The configuration I’ll be upgrading in this example consists of an older Nutanix 2000 series block with 2 blades and a newer Nutanix 7000 series block with one blade running ESXi 5.1.0 build 1065491:

image

image

image

This upgrade was performed a while ago so the version we’ll be upgrading to is VMware ESXi 5.5 build 1331820.

Step #1 – Download Upgrade Package

I find that one of the questions I get asked most from colleagues and clients are that they cannot find the the upgrade package by navigating through VMware’s download section.  The reason for this is usually because they are navigating to an update of version 5.5.0 with the path such as:

Home –> All Downloads –> VMware vSphere –> VMware ESXi 5.5.0 Update 1

The section above provides the following options:

  • ESXi 5.5 Update 1 Driver Rollup 2 (includes VMware Tools)
  • ESXi 5.5 Update 1 Driver Rollup 2 README
  • ESXi 5.5 Update 1 ISO image (includes VMware Tools)
  • ESXi 5.5 Update 1 Offline Bundle

imageimage

None of the above can actually be used to upgrade our blades from ESXi 5.1 to 5.5 because the ESXi 5.5 Update 1 Offline Bundle is only used for updating 5.5.0 to 5.5.0 U1.  Downloading the first package on the list would provide you with ISOs for installing ESXi 5.5U1 on a new blade.  As an example, here’s what the contents of the VMware-ESXi-5.5U1-Rollup_2ISO.iso contain:

image

image

The correct page that you’re looking for is to select the RTM version of 5.5.0 as such:

image

Here is where you will find the ESXi Offline Bundle:

image

The upgrade package should be in the form of a zip package that ends with -depot.zip:

image

image

Opening the zip package should show the following file and folders:

vib20 – Folder
vmv-ESXi-5.5.0-metadata.zip – File
index.xml – File
vendor-index.xml – File

image

Step #2 – Upload Upgrade Package to Datastore

With the upgrade package downloaded, proceed by uploading the package to a datastore accessible by all of the hosts:

imageimage

Step #3 – Connect to CVM to Execute Upgrade

With the upgrade package uploaded, proceed by SSH-ing to any one of the CVMs:

image

… then execute the following:

i in `hostips`;do echo $i && ssh root@$i "esxcli software vib install -d /vmfs/volumes/NutanixNFS/VMware-ESXi-5.5.0-1331820-depot.zip";done

Note that you will need to change the path to the upgrade package (highlighted in red) to reflect the environment you are working in.

--------------------------------------------------------------------------------------------------------------------------------------------------------------

Note that if you receive the following error:

ssh: Could not resolve hostname hosttips: Name or service not known

image

It’s because you need to replace the characters for hostips with the symbol beside the 1 key:

for i in 'hostips';do echo $i && ssh root@$i "esxcli software vib install -d /vmfs/volumes/NutanixNFS/VMware-ESXi-5.5.0-1331820-depot.zip";done

--------------------------------------------------------------------------------------------------------------------------------------------------------------

The output of the upgrade should look something similar to the following:

image

image

The output from the SSH session should display the following for each successfully upgraded blade in the cluster:

Installation Result

Message: The update completed successfully, but the system needs to be rebooted for the changes to be effective.

Reboot Required: true

Step #4 (Optional) – Upgrading individual blades

If there is any issue with upgrading a specific blade in the cluster via the command ran in the CVM or if you would like to upgrade one blade to test, it is possible to simply SSH directly to the ESXi host and use the regular esxcli command to upgrade the host as such:

esxcli software vib install -d /vmfs/volumes/NutanixNFS/VMware-ESXi-5.5.0-1331820-depot.zip

image

imageimage

Step #5 – Apply Update Packages

With the hosts upgraded to the latest version, you can proceed with repeating the same process as Step #3 or #4 to apply Update packages downloaded from the appropriate section of the site:

image