Pages

Friday, April 26, 2019

Attempting to rebalance VMware Horizon View linked-clones desktop pool datastore fails with: "Refit operation rebalance failed"

Problem

You attempt to migrate a linked-clone pool’s storage from one datastore to another by using the rebalance feature as outlined in the following KB:

Migrating linked clone pools to a different or new datastore (1028754)
https://kb.vmware.com/s/article/1028754

… but notice that the operation attempts the migration on a few desktops but fails with the error: Refit operation rebalance failed in the Events log of the linked-clones desktop pool:

Clicking on the ellipsis icon for the error for more information does not reveal additional information:

Navigating outside of the Events log of the linked-clones desktop pool then into the Inventory view and clicking on the ellipsis icon for the desktop in error displays the following message:

Apr 5, 2019 8:34:03 PM ADT: View Composer Invalid Parent VM Fault: View Composer Invalid Parent VM Fault: Selected snapshot on parent VM is not found on VC server

Pairing state:

Configured by:

Attempted theft by:

Solution

This error is usually caused by situations where the master image for the linked-clones pool no longer have the snapshots that the desktops being moved are associated with.  The rebalance operation requires access to the snapshots in order to re-clone the replicas (snapshots) to the new datastore so if they no longer exist then this error would be thrown.  In the case of the environment, the pool of 200 desktops had a mix of 5 different snapshots where only 1 of them was still available on the master image.  To view the linked-clones desktops and the associated snapshot that are being used, navigate to Inventory > Machines (View Composer Details) and review the Image tab:

If the snapshots have already been deleted then the way to remediate the error is to recompose all the snapshots with an existing snapshot on the master image or create a new one and recompose with it.  The rebalance operation should complete successfully once all the linked-clone pools are using a snapshot that exists.

Thursday, April 25, 2019

Deploying Skype for Business Server 2019 Archiving and Monitoring Services

Deploying Skype for Business Server 2019 archiving and monitoring services are fairly much the same as the previous version but I thought it would be a good idea to write this updated post to demonstrate the process.  Before I begin, note that the official planning documentation Monitoring can be found here:

Deploy archiving for Skype for Business Server
https://docs.microsoft.com/en-us/skypeforbusiness/deploy/deploy-archiving/deploy-archiving

Deploy monitoring in Skype for Business Server
https://docs.microsoft.com/en-us/skypeforbusiness/deploy/deploy-monitoring/deploy-monitoring

Step #1 – Define Archiving and Monitoring services on Front End Server / Pool Properties

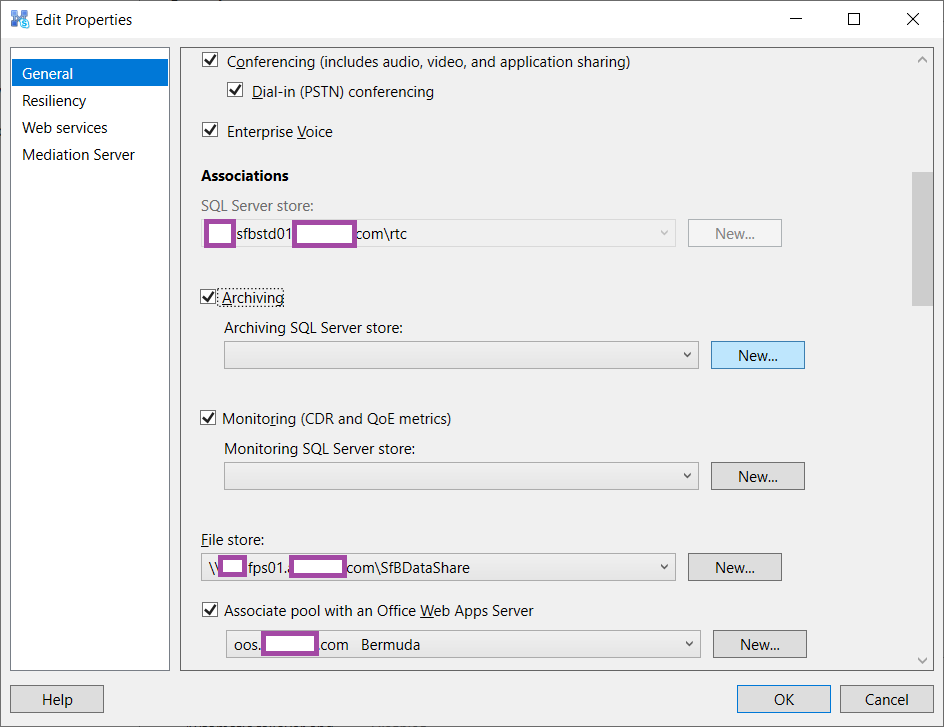
Begin by editing the properties of the front-end pool, navigate to the General properties and scroll down to the Associations section:

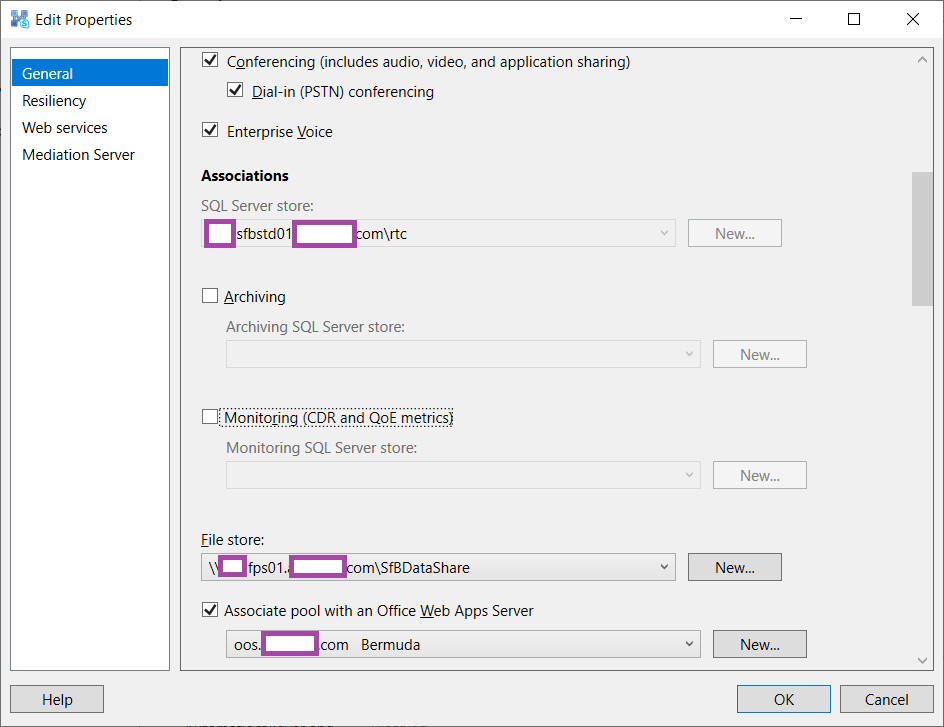
Enable the Archiving and Monitoring (CDR and QoE metrics) options:

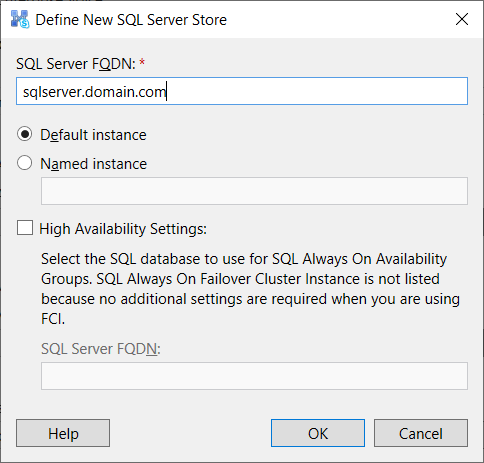
Enter the FQDN of the SQL server that will be hosting the two databases when presented with the Define New SQL Server Store menu:

Select the same or create a new SQL instance for the monitoring service then click OK:

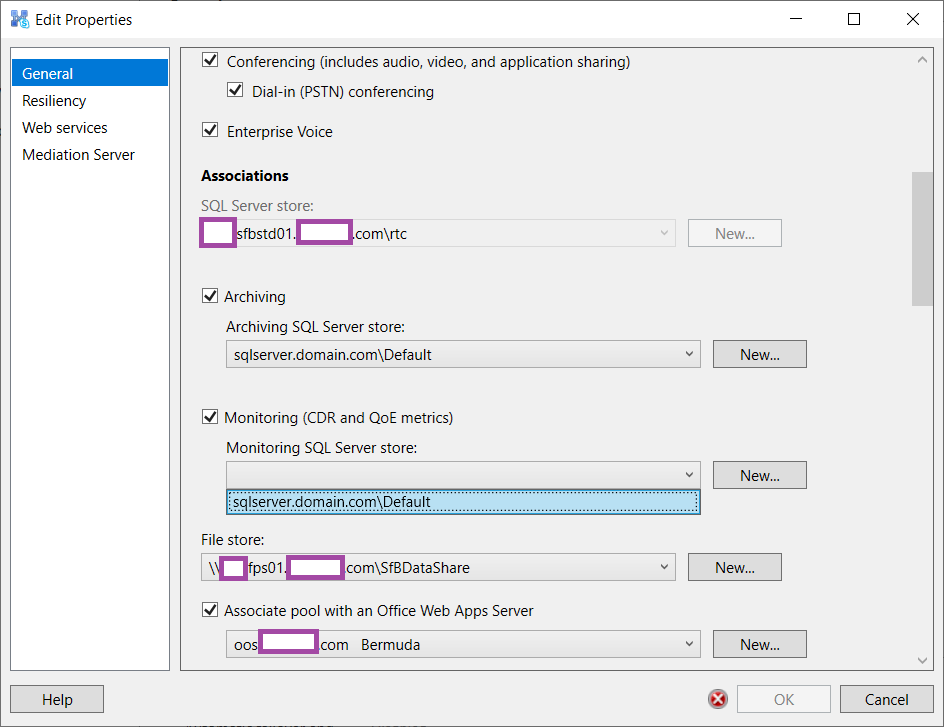
The archiving SQL Server store and Monitoring SQL Server store should now have the new SQL server instance defined:

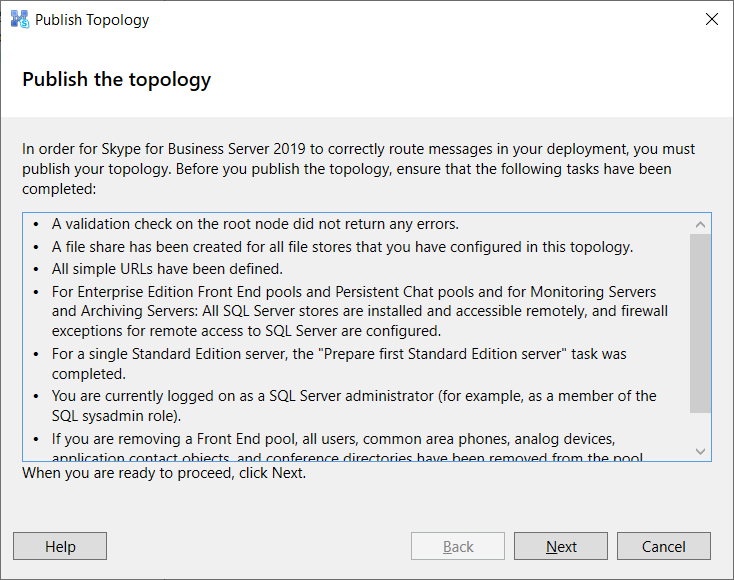
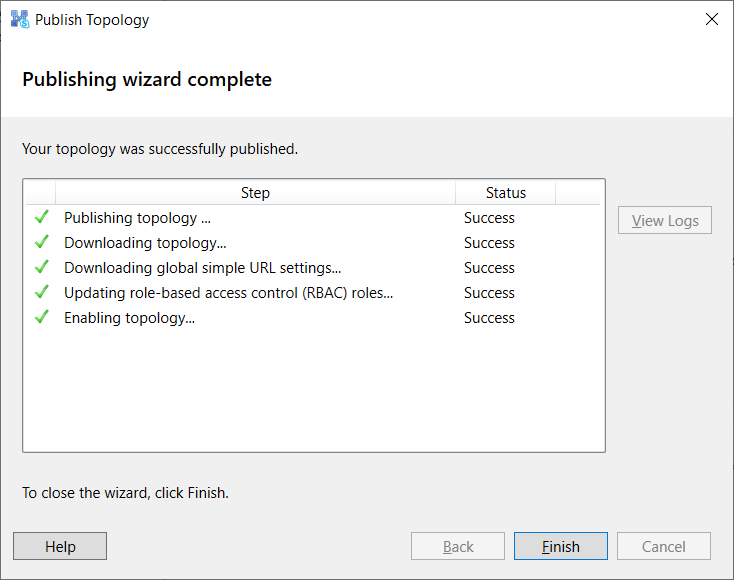
Publish the topology:

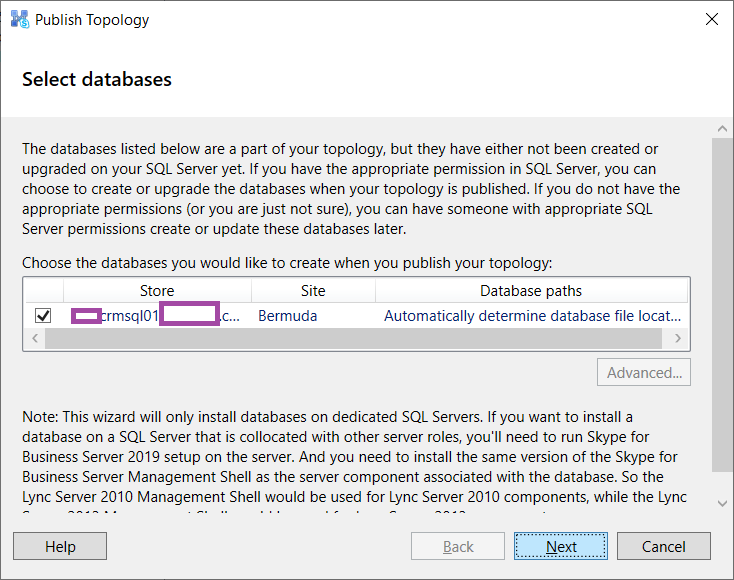
The Publish Topology wizard will present you with the option to either automatically let the wizard determine where to store the database or manually changing the path by going into the advanced options:

Selecting advanced will present the following menu:

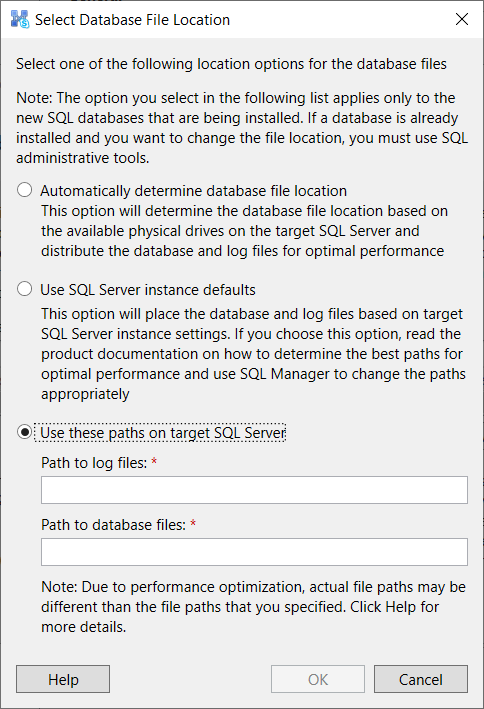
What I don’t like about this is that the database doesn’t get stored in the paths defined but rather in sub folders such as D:\Database\ArchivingStore\(default)\DbPath.  You can, obviously, change this afterwards or at least have them on the correct drives.

Step #2 (Optional) – Move SQL database and log files to appropriate location

If you are not satisfied with the path in which the database and the log files are stored, you can use the following SQL queries to change the path after taking the database offline:

ALTER DATABASE LcsCDR  

    MODIFY FILE ( NAME = LcsCDR_data,  

                  FILENAME = 'D:\Database\LcsCDR.mdf'); 

GO

ALTER DATABASE LcsCDR  

    MODIFY FILE ( NAME = LcsCDR_log,  

                  FILENAME = 'D:\Log\LcsCDR.ldf'); 

GO

ALTER DATABASE LcsLog  

    MODIFY FILE ( NAME = LcsLog_data,  

                  FILENAME = 'D:\Database\LcsLog.mdf'); 

GO

ALTER DATABASE LcsLog 

    MODIFY FILE ( NAME = LcsLog_log,  

                  FILENAME = 'D:\Log\LcsLog.ldf'); 

ALTER DATABASE QoEMetrics  

    MODIFY FILE ( NAME = QoEMetrics_data,  

                  FILENAME = 'D:\Database\QoEMetrics.mdf'); 

GO

ALTER DATABASE QoEMetrics 

    MODIFY FILE ( NAME = QoEMetrics_log,  

                  FILENAME = 'D:\Log\QoEMetrics.ldf'); 

GO

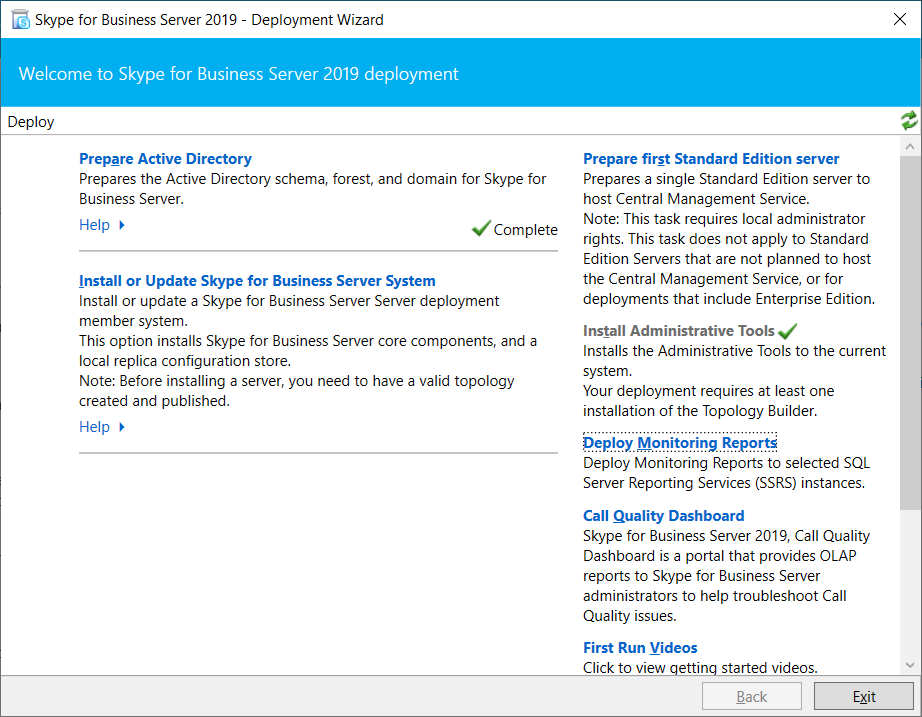
Step #3 – Deploy Monitoring Reports on SSRS

With the databases created, proceed by launching the Deployment Wizard and click on Deploy Monitoring Report:

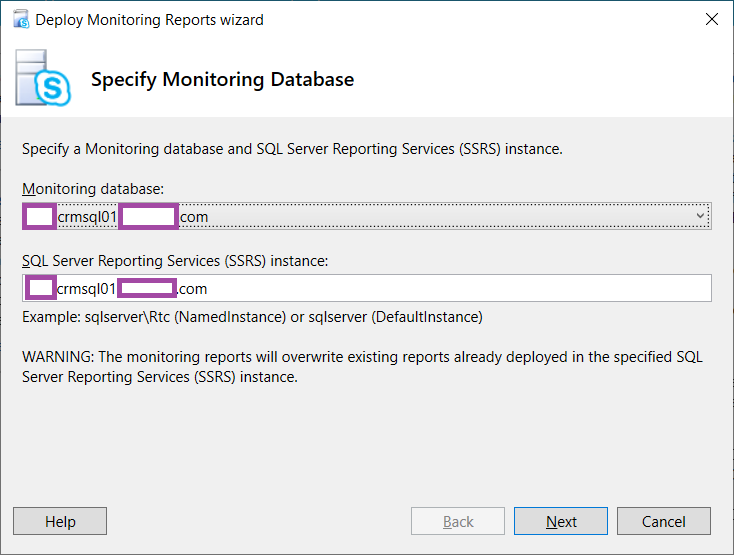
Select the appropriate SQL instance and define the SQL Server Reporting Services (SSRS) instance:

**Note that as the wizard indicates, this will overwrite existing reports so be cautious of any SSRS reports that may already exist on the server.

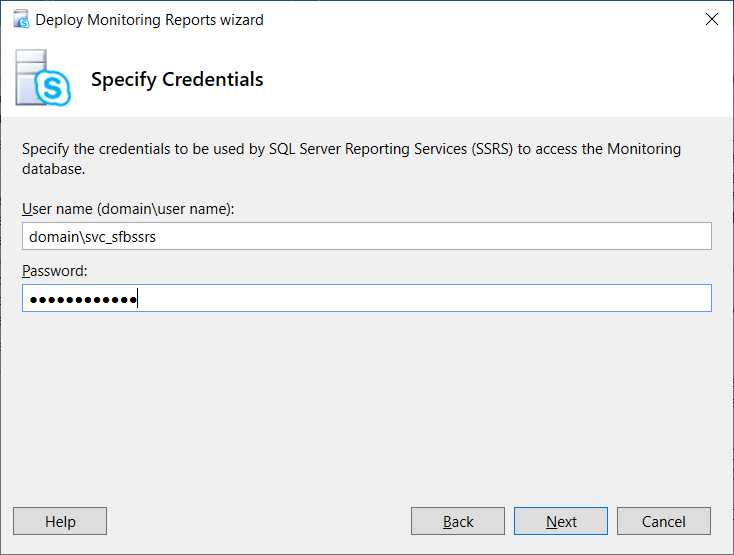
Enter an account that will be used to access the Monitoring database:

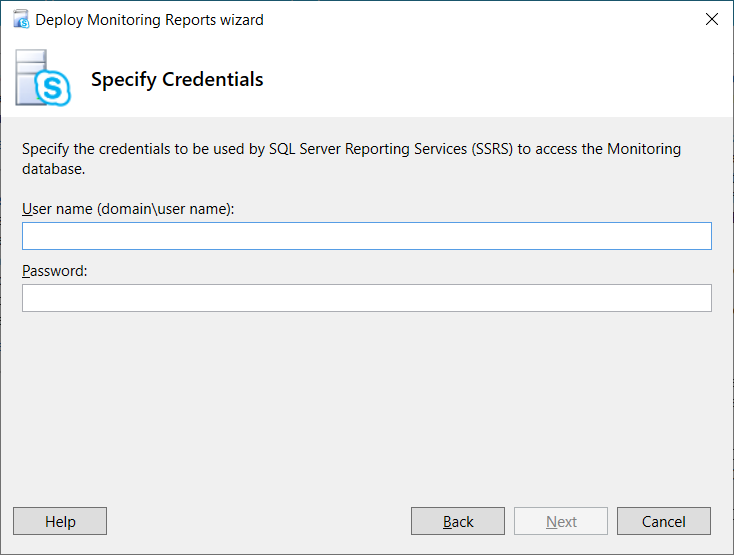
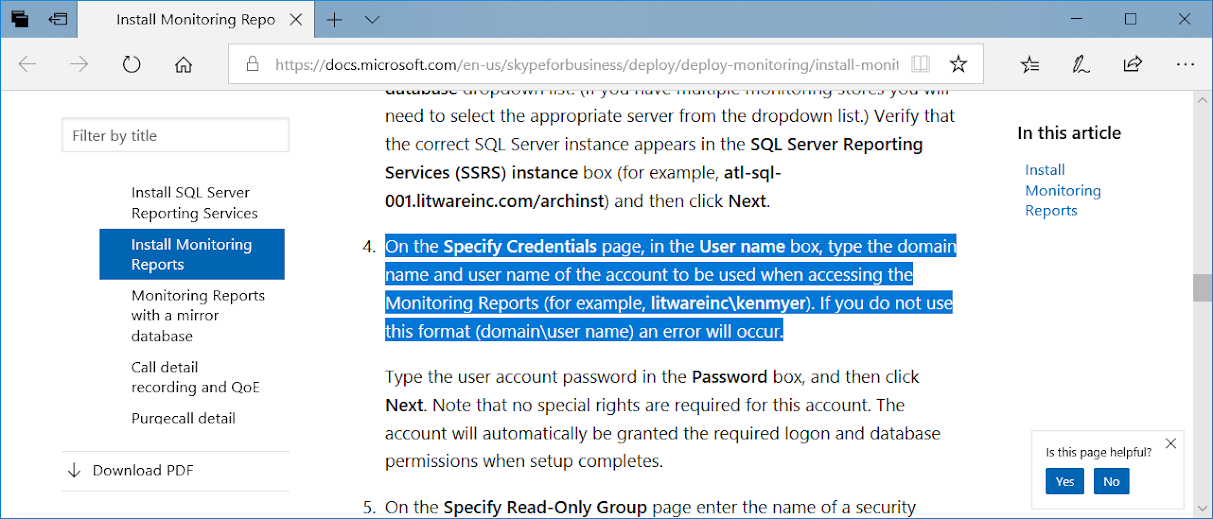
I’ve been asked many times in the past about what credentials should be entered and the short answer is to use a service account because this account will be granted required logon and database permissions to the database in order for it to access the database.  The documentation about this can be found here:

Install Monitoring Reports in Skype for Business Server
https://docs.microsoft.com/en-us/skypeforbusiness/deploy/deploy-monitoring/install-monitoring-reports

On the Specify Credentials page, in the User name box, type the domain name and user name of the account to be used when accessing the Monitoring Reports (for example, litwareinc\kenmyer). If you do not use this format (domain\user name) an error will occur.

Type the user account password in the Password box, and then click Next. Note that no special rights are required for this account. The account will automatically be granted the required logon and database permissions when setup completes.

I usually prefer to create a service account for this:

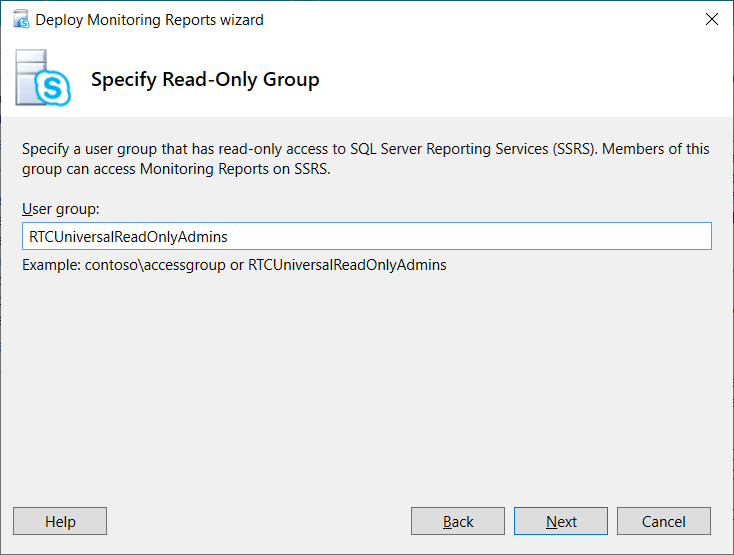
Define a group that will have read-only access to SQL Server Reporting Services (SSRS):

**Note that the default is RTCUniversalReadOnlyAdmins

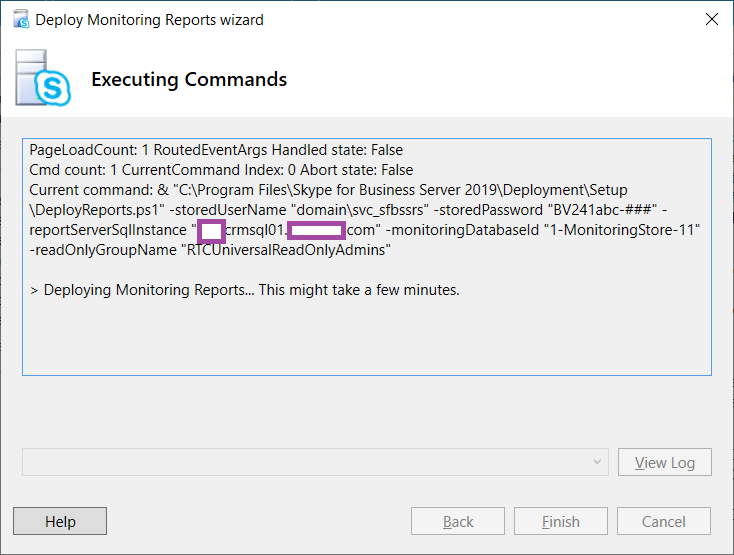
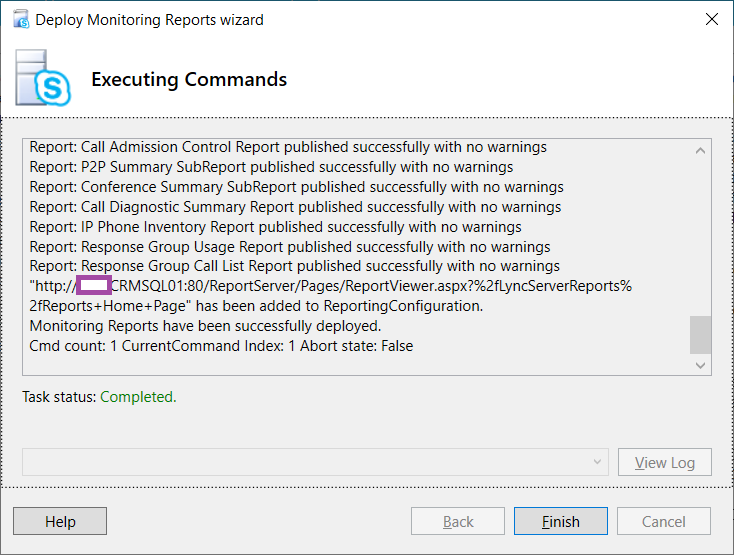
The wizard will complete the deployment with the information provided:

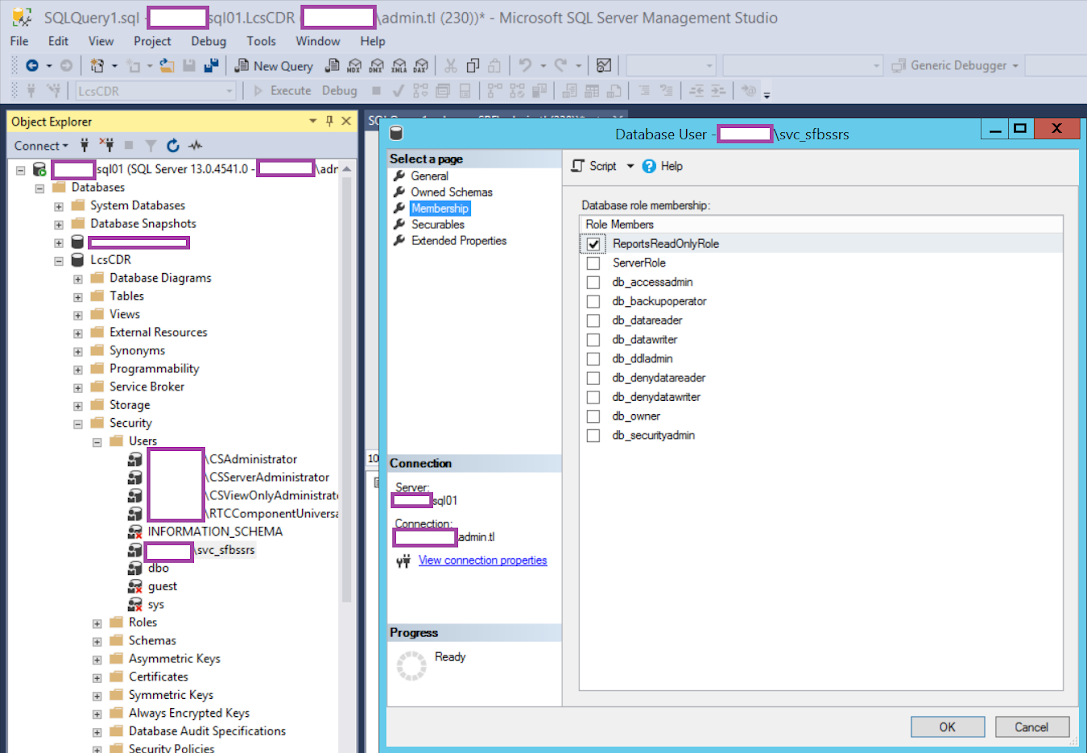
Once completed, you should see the service account granted ReportsReadOnlyRole to the databases:

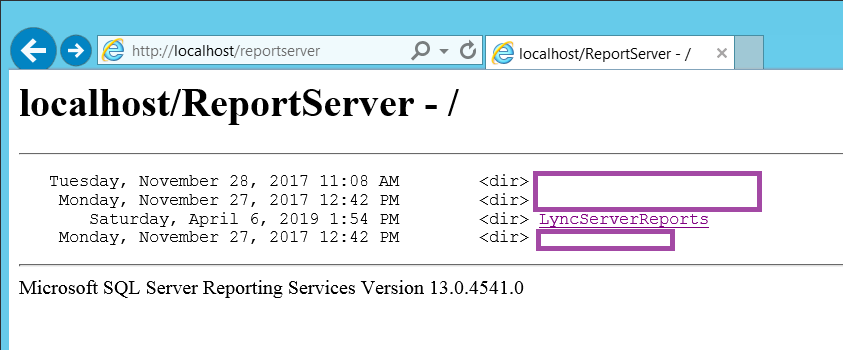
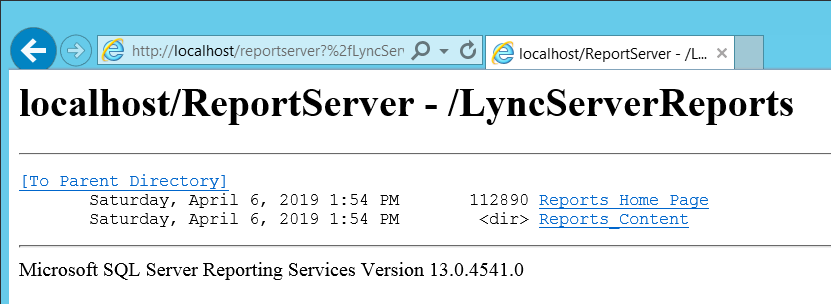
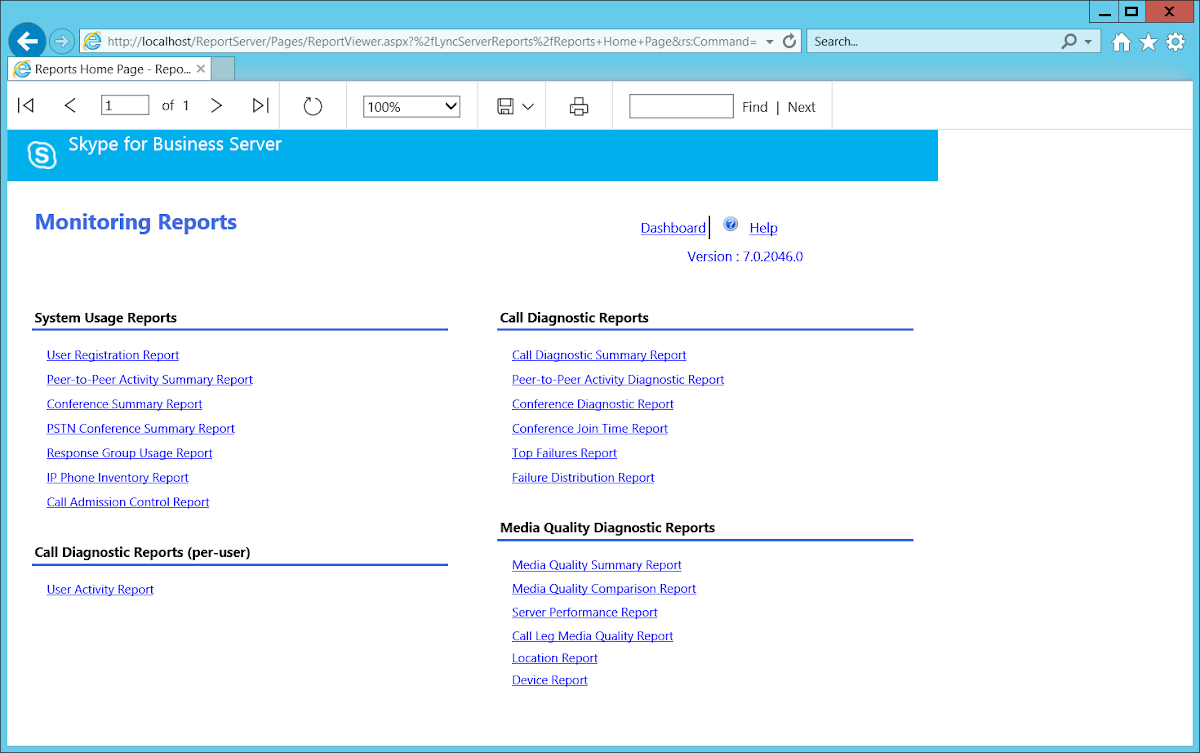
Step #4 – Test Monitoring services reports

The reports can now be accessed via the following URL:

http://<SSRS_Server>/reportserver

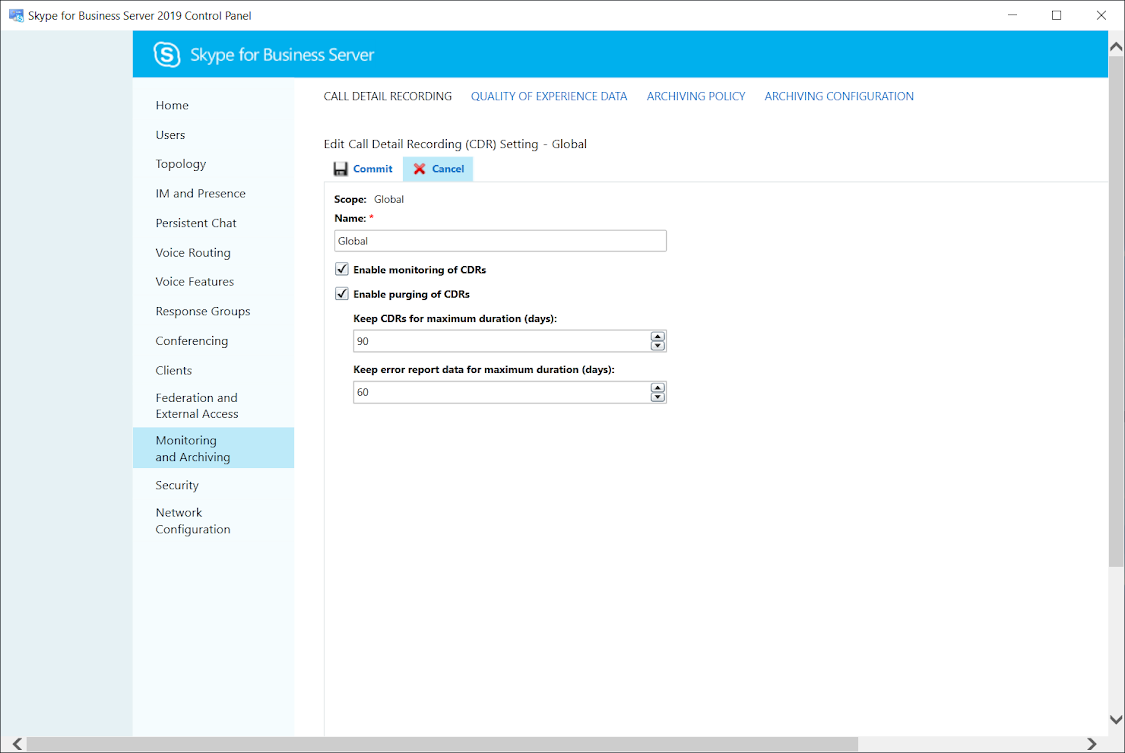
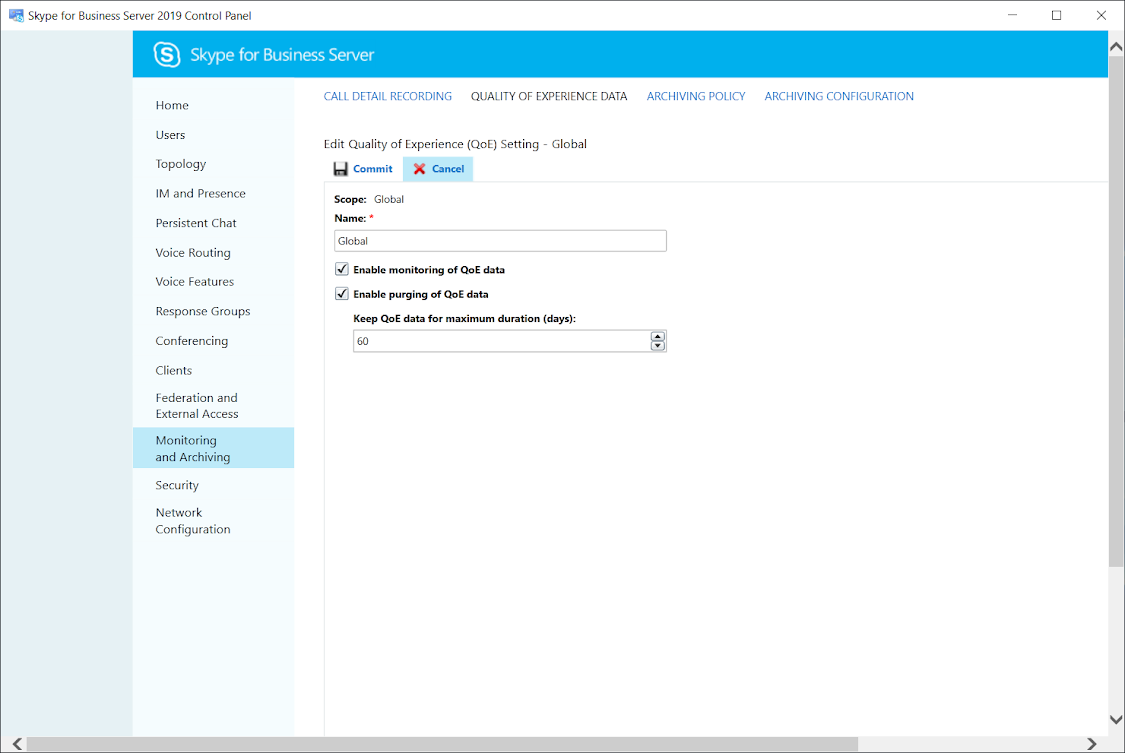
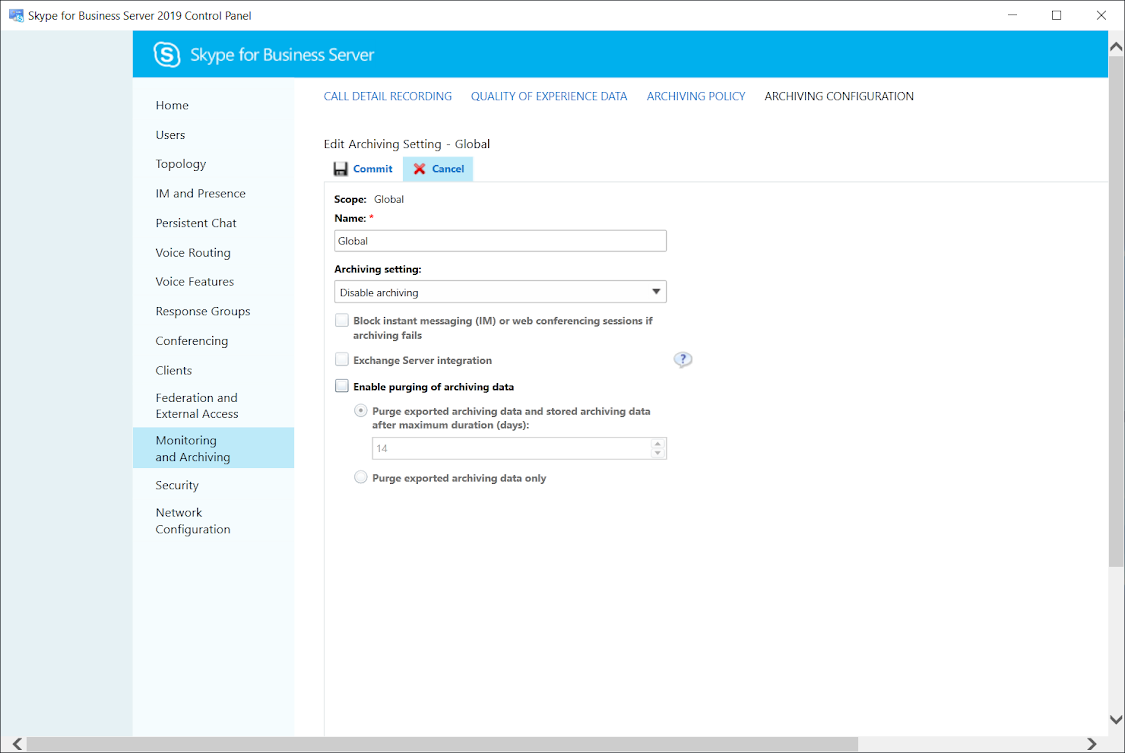
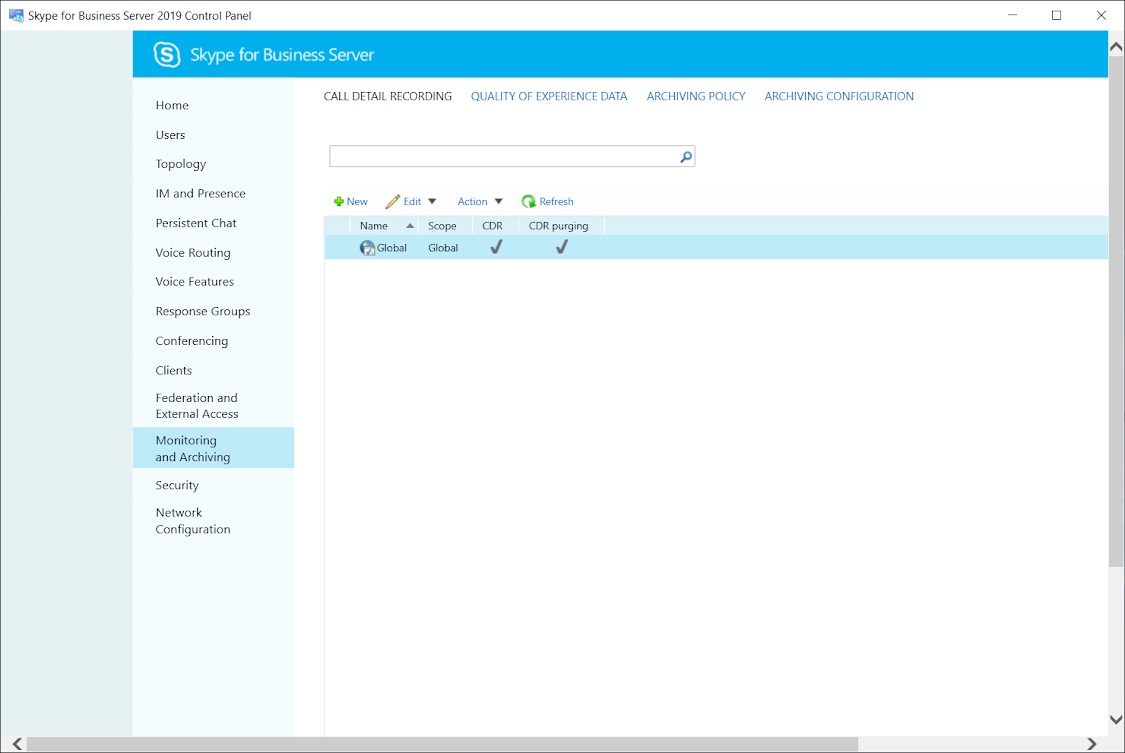
Step #6 – Configure Monitoring and Archiving Reports

It is generally not advisable to just leave the configuration for the monitoring or archiving reports as the default (you should at least review the default settings to ensure it meets the requirements of the organization) so proceed to launch the Skype for Business Server 2019 Control Panel and navigate to Monitoring and Archiving:

Go through the menus and edit the global properties or create a new one for the organization:

Wednesday, April 24, 2019

Running Remote Connectivity Analyzer against Exchange 2013/2016/2019 fails with: “MAPI over HTTP connectivity failed.”

Problem

You use the Remote Connectivity Analyzer to test external connectivity for an Exchange 2013/2016/2019 environment but notice that it fails with the following error:

Testing MAPI over HTTP connectivity to server mail.contoso.com
      MAPI over HTTP connectivity failed.
      
Additional Details
      Elapsed Time: 11 ms.

     
Test Steps
      
Attempting to resolve the host name contexc02.contoso.com in DNS.
      The host name couldn't be resolved.
        Tell me more about this issue and how to resolve it

     
Additional Details
      Host contexc02.contoso.com couldn't be resolved in DNS InfoDomainNonexistent.
Elapsed Time: 11 ms.


What’s strange about the error is that the server FQDN referenced in the message has the FQDN of the internal server name and domain name.

Solution

As much as the error suggests this caused by MAPI over HTTP, you may notice that executing the cmdlet:

Get-MapiVirtualDirectory | FL ServerName, *url*, *auth*

… would reveal that the configuration for the external MAPI Virtual Directory is already configured with the appropriate URL.

Executing the cmdlet:

Get-OrganizationConfig | fl identity,*mapi*

… will also indicate that MAPI over HTTP is enabled.

What typically causes this issue is if Outlook Anywhere has not been configured.  You can review the settings on each of the servers either by executing the following cmdlet:

Get-OutlookAnywhere | FL Identity,*Host*,*requireSSL*

… or navigating to the server properties’ Outlook Anywhere section, which would likely have the internal server’s FQDN as that is the default:

Either adjust the configuration in the EAC for each server appropriately or use the following cmdlet to configure the settings:

Set-OutlookAnywhere -Identity:"<serverName>\Rpc (Default Web Site)" -DefaultAuthenticationMethod NTLM -InternalHostname <internalFQDNURL> -InternalClientsRequireSsl $true -ExternalHostname <externalFQDNURL> -ExternalClientsRequireSsl $true -SSLOffloading $false

The Remote Connectivity Analyzer should return successful results once this has been corrected.

Tuesday, April 23, 2019

VMware Horizon View virtual desktop in “agent unreachable” status because OS is in repair boot mode

One of the common issues I’ve seen in many virtual desktop environments such as VMware Horizon View (or Citrix XenDesktop) is when a Windows 10 virtual desktop has crashed and gone into the repair mode upon reboot thus causing Horizon View to report the desktop as agent unreachable:

Reviewing the console of the virtual desktop in vCenter will confirm that it has booted into the recovery screen:

There isn’t really a benefit for having this feature on because it causes desktops to never boot into the operating system and therefore generating help desk calls.  The way to disable this feature is through the use of the command: bcdedit

Executing this command in the command prompt will display the configuration of the Windows Boot Loader and whether the recoveryenabled setting is set to Yes or No:

To disable the feature, simply execute the following command:

bcdedit /set recoveryenabled NO

Executing bcdedit after the configuration should show the recoveryenabled configuration set to No:

Those who still have Windows 7 virtual desktops in their environment can use the following command:

bcdedit /set {default} bootstatuspolicy ignoreshutdownfailures

Monday, April 22, 2019

Attempting to send an email with attachment in Outlook 2016 fails with: “The function cannot be performed because the message has been changed.”

Problem

You’ve received reports from users that they would intermittently receive the following error messages when they send an email with an attachment:

The function cannot be performed because the message has been changed.

The operation failed. The messaging interfaces have returned an unknown error. If the problem persists, restart Outlook.

This item is no longer valid because it has been closed.

The Outlook version installed is Microsoft Outlook 2016 MSO (16.0.4738.1000) and Exchange Server 2019 CU1 is where the mailbox is hosted.

This doesn’t to happen with all attachments and appear to only affect attachments that are several MBs in size (under 1MB appears to work but 3MB+ does not).

Solution

Troubleshooting this issue was difficult as it was not easy to replicate and the event logs did not log any errors but after locating several attachments that didn’t work, it was observed that problematic attachments would cause the Outlook window to hang for several seconds and the Send as Adobe Document Cloud link would appear in the email:

This lead me to believe that it may be a plugin issue so I navigated into the the COM Add-ins window, disabled the Adobe Document Cloud for Microsoft Outlook – Acrobat add-in, tested again and the problem went away:

This environment was undergoing an Exchange 2013 to 2019 migration and this appears to only affect migrated users so our suspicion is that the following Adobe Acrobat DC 19.010.20098 reader needs to be updated:

Sunday, April 21, 2019

Attempting to execute Exchange PowerShell cmdlets on objects in another domain fails with: “The operation couldn't be performed because object 'alias@domain.com' couldn't be found on 'DC01.domain.com'.”

One of the common questions I have been asked over the years is why the following error is thrown when an Exchange PowerShell cmdlet is executed on an object in another domain where the Exchange Organization is not installed with.  The following is an example of the scenario:

  1. The environment has 1 forest and multiple domains
  2. The root domain name is contoso.com
  3. Another domain named tradewinds.com is in the same forest but a separate tree
  4. Exchange is installed into the contoso.com domain

You log onto one of the Exchange servers in the contoso.com domain and attempt to execute a cmdlet for an object in the tradewinds.com domain but receive the following error:

Get-MailboxPermission -Identity inbox@tradewinds.com
The operation couldn't be performed because object 'inbox@tradewinds.com' couldn't be found on
'contDC01.contoso.com'.
     + CategoryInfo          : InvalidData: (:) [Get-MailboxPermission], ManagementObjectNotFoundException
     + FullyQualifiedErrorId : [Server=contBMEXMA01,RequestId=c60334ef-7152-42ec-98f0-f838d0a90283,TimeStamp=4/5/2019 12
    :36:27 PM] [FailureCategory=Cmdlet-ManagementObjectNotFoundException] E1D4908D,Microsoft.Exchange.Management.Recip
   ientTasks.GetMailboxPermission
     + PSComputerName        : contbmexma01.contoso.com

The reason why this error is thrown is because any cmdlets executed in the default context will only look up objects in the domain where Exchange is installed.  In order to search for objects outside of the current domain, you will either need to:

  1. Log onto an Exchange server that is joined to that domain (if there is one)
  2. Use the DomainController switch to specify a domain controller in that domain
  3. Execute the follow cmdlet to expand the scope to include the entire forest (not that this can cause searches to be slow if the environment is large):

Set-AdServerSettings -ViewEntireForest $true

Monday, April 15, 2019

Remotely terminating a remote session on a Citrix XenApp or RDS server

I’ve been asked several times in the past about the following error that is presented if a user attempts to RDP (remote desktop) to a Citrix XenApp application server:

The target session is incompatible with the current session.

The reason why this message would be presented is because account used for the RDP connection already has an previous ICA session in a disconnected state.  You can verify this by using the net use command to connect to the server, then the query session command to list the sessions on the server:

Step #1 – Connect to the remote server

Launch the command prompt and execute the following:

net use \\<serverName> /user:<adminUserName> <Password>

The command should display the following message if the connection is successful:

The command completed successfully.

Step #2 – Query session on the remote server

Execute the following command to list the sessions on the remote server:

query session /server:<serverName>

The command should display sessions along with the following headings:

  • SESSIONNAME
  • USERNAME
  • ID
  • STATE
  • TYPE
  • DEVICE

Locate the username you are looking as well as the ID number.

Step #3 – Terminate session on the remote server

With the ID of the username you want terminate located, execute the following command to terminate it:

reset session <ID> /server:<serverName>

Step #4 – Confirm that the session on the remote server has been terminated

The command will not provide any output after completion so execute the query session command to confirm that the session has been terminated:

query session /server:<serverName>

Below is an example of the output from the commands executed above:

You should be able to RDP to the server now that the session is no longer present for the account connecting.

Saturday, April 13, 2019

Attempting to upgrade Microsoft Exchange Server 2016 from CU8 to CU12 fails with: “Setup can't continue with the upgrade because the mscorsvw (3152) has open files.”

Problem

You’re attempting to upgrade Microsoft Exchange Server 2016 from CU8 to CU12 but the process fails at the Prerequisite Analysis with:

Setup can't continue with the upgrade because the mscorsvw (3152) has open

files. Close the process, and then restart Setup.

For more information, visit: http://technet.microsoft.com/library(EXCHG.150)/ms.

exch.setupreadiness.ProcessNeedsToBeClosedOnUpgrade.aspx

Solution

This error is typically thrown shortly after a server restart when the .NET framework’s Native Image Generator Technology (NGEN) is running in the background.  It is not a good idea to try and terminate the process and waiting for around 10 minutes is usually enough time for the process to complete depending on how fast the server hardware can complete the operations.

For the environment in this example, it took about 8 minutes for the installer to successfully run:

Friday, April 12, 2019

Attempting to enable a user for Unified Messaging in Exchange Server 2016 fails with: "Extension xxxx is already assigned to another user on the dial plan UMDialPlan or on an equivalent dial plan."

Problem

You attempt to enable a user for Unified Messaging in Exchange Server 2016 but receive the following error:

Extension xxxx is already assigned to another user on the dial plan UMDialPlan or on an equivalent dial plan.

You know that this extension was previously assigned to another user so you search for the previous user and can confirm that Unified Messaging for the user is disabled:

Reviewing the properties of the account’s email address properties confirm there are now EUM addresses:

Executing the following cmdlets does not display this extension assigned to anyone in the dial plan:

Get-UMMailbox | where { $_.Extensions -eq "9533" }

Get-UMMailbox | Format-Table -Wrap -AutoSize > C:\UMExt.txt

You proceed to review the msExchShadowProxyAddresses attribute in the previous user’s AD user account’s properties’ Attribute Editor:

You can see that an eum address with the extension and proceed to remove it.

However, this does not correct the issue as the same error message is thrown.

Solution

I can’t take full credit for the solution but figured it would be worth blogging since it took over an hour for me to locate a cmdlet that was able to find the find the offending user.  This cmdlet can be found on this forum post:

https://social.technet.microsoft.com/Forums/en-US/55dc00d5-2301-49d0-9a02-482d237c339b/exchange-server-2013-enableummailbox-error-extension-2909-is-already-assigned-to-another-user-on?forum=exchangesvrunifiedmessaging

The cmdlet was:

Get-ADobject -filter * -Properties name,msRTCSIP-Line,telephoneNumber,proxyAddresses | Select-Object name,msRTCSIP-Line,telephoneNumber,@{Name="proxyAddresses";Expression={[string]::join(";",( $_ | Select-Object -ExpandProperty proxyaddresses ))}} | Where-Object { $_.proxyAddresses -like "*9533*" } | Format-table -Wrap -AutoSize

This user was also had Unified Messaging disabled:

However, the eum attribute was visible in the properties of the email address settings:

Removing the attributes corrected the issue.